
Photography Tips And Beer

Overview
While photographing at a brewery and enjoying some new content 🍺 I had the idea to make a list of photography tips and tricks specific to my shooting process, beyond the boilerplate fare like the rule of thirds and avoid camera shake (duh) – those are all second nature to many. Rather, these are my mental steps when shooting and editing, assembled into a digestible collection that I hope others will find useful.
This article assumes you have a good working knowledge of your camera, and are able to manage its settings comfortably. For editing, I specifically use Lightroom CC (not Lightroom Classic), though these editing tips are mostly universal.
General Setup
I primarily shoot lifestyle/street images, with a little bit of product and portraiture. Much of it winds up as website assets and social media material and are often accompanied by text or other graphic design elements. Every shot that comes off the camera gets batched into Lightroom for simple edits – a baseline if you will – for color, clarity, contrast, cropping, correction, and other alliteration.
I usually stick with the following guidelines when photographing:
Always shoot RAW. Even if you just need some low-res website assets, RAW gives the most flexibility.
Bring no more than two lenses (or even two cameras with one lens each; what are you, filthy rich?) and keep the swapping to a minimum. The only bad shots are ones you missed while changing lenses in the moment. You’ll have an idea of what you’re shooting beforehand, so only bring the most suitable gear to keep your kit light.
Unless you are shooting products or portraits, reaction speed and catching the moment is far more important than mucking about with settings and lens changes.
Ideally have a fast prime for portraits (35mm, 50mm, or 85mm f / 1.8 lenses are superb) and a wider zoom for flexibility. With the primes, you’ll find yourself moving a lot more to compose shots.
I get the most use out of a 35mm f / 1.8 because it has just enough field of view that I can use it in small rooms. If I had a nickel for every time I was shooting with a 50mm and said “…oh wait, wow this is a tiny room, I can’t back up any further…” I’d be Scrooge McDuck swimming around in my vault of nickels.
Zoom lenses are great, but generally slower, less depth of field, though easier to compose shots and grab distant close-ups for the lazy photographer. A 28-70mm f / 2.8-4 lens is solid, fast enough, and relatively inexpensive. A stabilized 18-200mm 🧡 or 50-250mm is also killer.
No flash indoors unless you can bounce it off the ceiling, diffuse it, or move it off the camera axis. ‘Default’ flash photography is bad. All of it. Especially from a phone camera.
Carry a reflector and diffuser. These are the best, cheapest pieces of gear with the biggest impact. More about this in the topics below.
All that said, if you are shooting products or portraits, have controlled, off-camera strobes, light meters, and other pro gear, you have all the time in the world to compose and bracket. As for general purpose picture taking, such as street photography, the above is a good starting point for solid results with minimal fuss. You’ll quickly learn through experience and get comfortable with your own methods.
Shooting
Always shoot RAW
I want to give this a quick mention. JPG is fine, but RAW is the best possible quality with the most flexibility for editing and retouching – which is the focus of this article. This means you shouldn’t shoot JPG exclusively, though shooting both RAW+JPG has the benefit of sharing the file easily via wifi/bluetooth (if your camera has that capability). JPGs are typically bland sad-sauce, and require the same general edits as the RAW shots anyway. No reason you should have to do things twice.
Note: Shooting RAW takes up lots of space, so get a big memory card (64-128GB), and toss the obvious bad shots between sessions.

ISO 200 – 50 mm – f / 4.0 – 1/800 sec; JPG no adjustments.

ISO 200 – 50 mm – f / 4.0 – 1/800 sec; RAW cropped and adjusted.
Focus on The Eyes
In nearly every instance the focus should be on the subject’s eyes. This is doubly important when you’re up close with a doggo snoot and shallow depth of field. Don’t just aim for the face; be selective and specifically target the eyes. Newer cameras (like Nikon mirrorless Z 6/7ii and some others) have pretty fantastic eye-detection and focus-tracking capabilities.

ISO 200 – 50 mm – f / 4.0 – 1/800 sec; focus on the snoot.

ISO 200 – 50 mm – f / 4.0 – 1/800 sec; focus on the eyes.
Shoot in aperture priority mode
The ability to quickly adjust the depth of field and isolate the subject is often far more important than anything else. Unless you’re shooting landscapes and need literally everything in focus (f / 11+, slow shutter, and tripod), you’ll typically keep things between f / 2.8 and f / 8 and only make minor adjustments to ensure shutter the speed isn’t too slow. Which brings us to…
Shutter speed is your second concern
By mainly concerning yourself with the f-stop and how much depth of field you’d like, you’re allowing the camera to figure out the shutter speed, which is usually fine above 1/250 (or 1/125 if you don’t mind a little motion or need a flash). You might even get away with 1/80 or 1/60 sec – really just depends on how much beer you’ve had and how much zoom you’re using. With image stabilization, you may even get away with slower speeds.
If the shutter speed winds up being slower than 1/60 sec, I often switch to manual mode, leave my aperture as-is, and set the shutter to a somewhat safe 1/80 knowing I can brighten the exposure in Lightroom later at the loss of some quality. Which finally brings us to the last consideration…
ISO is your distant third concern
If you STILL don’t have enough shutter speed to comfortably get a stable shot, start turning up the ISO until you can (unless the camera does it for you). The following handheld shot has the aperture wide open at f / 3.2 and the ISO manually bumped up to 640 in order to get the shutter speed to 1/80 sec – my comfortable “shake-free” zone using a camera without stabilization. A noisy pic is workable, a blurry shot is not.

ISO 640 – 34 mm – f / 3.2 – 1/80 sec; this noisy boy is pushing it, but at least it’s in focus.
The challenge with the other priority modes (programmed auto, shutter priority, and the various ‘scenes’ in point-and-shoot models) is that you are at the mercy of the camera as it decides what’s most important. The camera may simply decide a 1/30 sec shutter is fine with an ISO 1600, or even fire the flash… and the resulting shot is hot garbage.
Use center-weighted metering
Center-weighted metering is a great way to have the camera recognize that the thing you are aiming at is indeed the thing you want properly exposed; the rest of the scene is less important. Matrix metering, on the contrary, can be unpredictable but workable, and single point metering is often savage and unforgiving.
The following shot was center weighted on the outdoor patio space, shooting into the sun, giving less focus to the darker interior areas, and not caring about the wacky lens flare and blown out sky.

ISO 800 – 50 mm – f / 3.2 – 1/2500 sec; metered on the patio crowd. Purposely wanted to lose detail on the shirt graphic and bar patron.
Overexposed is easier to fix
Slightly overexposed images are easier to fix than underexposed images. By overexposing an image, more details are captured in areas that would otherwise be black. It’s much easier to push those overexposed shadows back and make them darker if needed. It’s also much easier to recover highlights in blown out areas, and there’s less noise overall in the recovery process. Here’s an overexposed photo with the sky and shadows darkened with a gradient/vignette for balance.

The sky and shadows are a bit on the light side.

Highlights and shadows have been darkened and balanced.
Shoot during the golden hours
An hour after sunrise and an hour before sunset are arguably the best times of the day to photograph; shadows are long and the sky colors are magical. Photos will naturally have a golden glow and warmth, with long playful shadows and diffused lighting.

ISO 200 – 40 mm – f / 3.3 – 1/400 sec; mid-day, a freshly cleaned door.

ISO 800 – 50 mm – f / 3.2 – 1/1250 sec; golden hour, wish I remembered glass cleaner.
Diffuse lighting
Strong lights and midday sun can really harsh a buzz. One of the easiest ways to improve any subject is to move it out of direct sunlight – either by creating some shade, or using a diffuser.
Diffusers are inexpensive, easy to pack, and have plenty of utility. The shot below is the same beer seconds apart, first under direct sunlight, and the second with a diffuser. Notice the shutter speed between the two, not much else needs to be adjusted to account for the diffused lighting.

ISO 100 – 50mm – f / 2.8 (Aperture Mode) – 1/1000 sec – direct sunlight

ISO 100 – 50mm – f / 2.8 (Aperture Mode) – 1/640 sec – diffused lighting
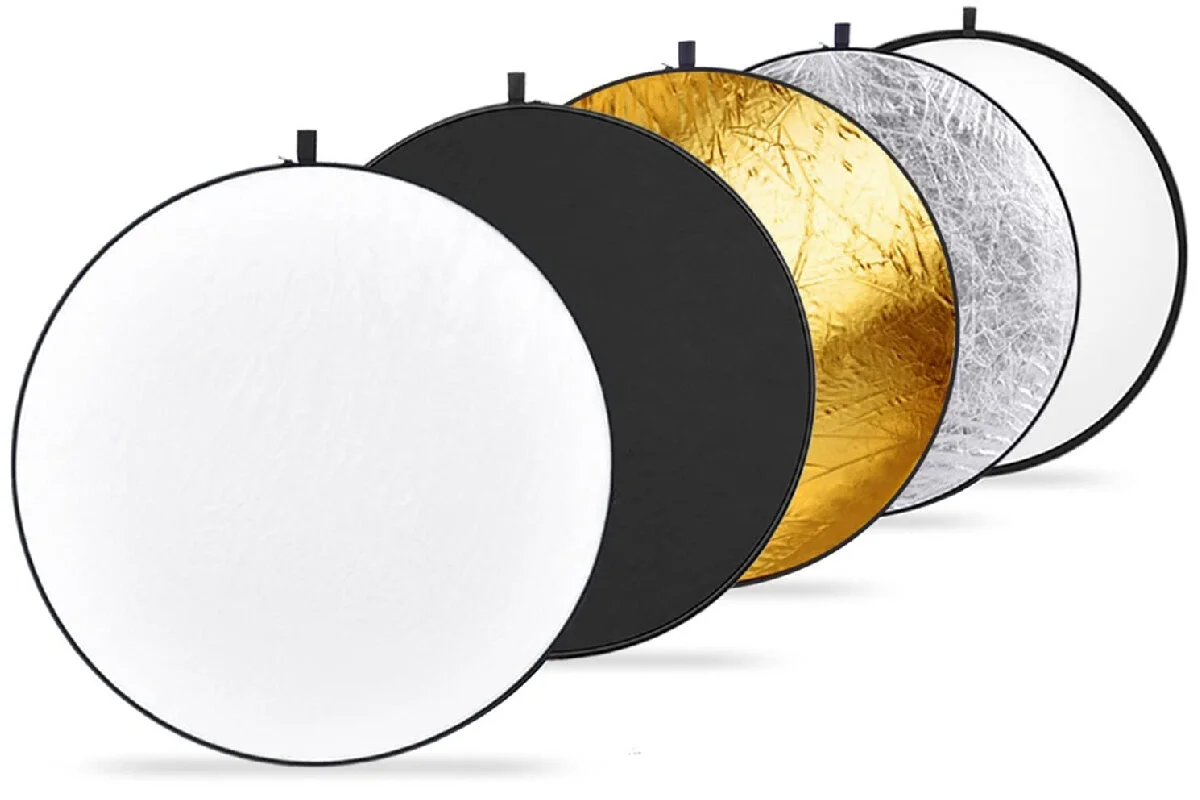
There’s a whole mess of fantastic, inexpensive diffusers, but you’ll want one that’s at least 36 inches or larger for occasional portrait work, and get one that’s included in a reflector kit. This is now your go-to carry for most photo sessions. When folded flat, the entire thing easily fits in a backpack.
Leave room for copy
Since most of my shots will be used for media and not simply art prints, be nice to clients by leaving room for text and titles. Creative compositions with negative space allows much more flexibility and utility for the photos. With large enough images, it’s easy to crop in on the subject. It’s quite a different story when needing to add more image where it doesn’t exist.

ISO 200 – 50mm – f / 4 – 1/800 sec

ISO 200 – 50mm – f / 2.5 – 1/2000 sec

Cropped for Instagram

Cropped for Instagram
Clean that sensor
Over time, sensors and lenses get dirty. A quick way to see exactly how dirty is to close the aperture as much as possible (usually f / 22) and shoot straight up at a bright sky using a low noise ISO (100 is good). The combination of a bright light source, low ISO, and tiny aperture will show even the smallest dust particles on the sensor. This also means that shooting with wide open apertures like f / 1.8 will mitigate this problem because the dust is far outside the focal plane. Though if you shoot a lot of f / 11+ shots such as landscapes, you’ll see plenty of specks and will certainly be motivated to clean your gear more often.
One could go years before remembering to clean their sensor… which reminds me… I’ll be right back.
Yeah, well I’ve seen worse…

ISO 100 – 50mm – f / 22 – 1/50 sec

Had NO idea there was a plane flying overhead.

Filthy filthy filthy dirty sensor.
If you change lenses often, give your sensor a regular, careful cleaning. For most occasions a simple air blower will do wonders, but if you need to use a heavier hand and actually touch the sensor (scary), here’s a great guide.

editing
I work in Adobe Lightroom CC, but many of these tips will also apply to other photo editing apps. Lightroom is simply too good; mobile connectivity, remote editing, and other quality-of-life workflow benefits are 💯🔥
Regarding Photoshop as an editing tool, it’s perfect for finishing work on individual images, healing large areas, and industrial strength fixes, but it’s harder/slower to batch photo edits and manage hundreds of images in one place. I try to leave Photoshop out unless I need it for some very specific reason on one particular image.
Importing Images & Organization
The fastest way to get the images from the camera to the computer is with a card reader, no question. Depending on your camera, you may be able to transfer images over wifi, or even directly connect from the camera to computer with a cable – though these methods may be slow as Christmas and sometimes only see JPG images and not the RAW files ¯\_(ツ)_/¯
I dump all my images into folders named according to the session, organized by year on my photo drive. So for this article, my folder path is simply 2021 > Lost Worlds Brewing Spring. The specific date, time, location, lens, focal length, shutter speed, etc. are all found easily enough in each photo’s EXIF info, which is applied to every photo by the camera, and is searchable – you’ll almost never lose anything.
Now we have every photo imported right? Sorted into their folders? Great! There are ways to further manage photos, add metadata, and really build a library. But let’s move on.
Assign a color profile
A quick win when editing is to use the Profile menu located at the top of the edit panel. There is a plethora of presets to give photos a nice baseline tone before fine tuning. You’ll find plenty of grayscale profiles, vintage filters, and other looks, but I tend to stick with basic clean Adobe Color Landscape, Portrait, Standard, and Vivid profiles. It’s worth a little exploration to get things rolling.


Black and White 11

Vintage 06

Adobe Landscape
Auto Adjust
Once a profile is set, hit Auto in the edit panel. This will have Lightroom analyze your image and make an honest attempt to adjust the Light and Color sliders to objectively good levels. It will get you about 90% there (and do a legitimately decent job), leaving heavier artistic decisions up to you.


Before auto adjusting

After auto adjusting
After auto-adjusting, my edits follow these general procedures:
Reduce Highlights significantly to recover blown-out details.
Brighten Shadows moderately to recover detail in darker areas.
Darken Blacks slightly to keep the darkest shadows.
Adjust Exposure if needed.
Leave the Whites alone (usually).
Leave the Contrast alone (usually).
Adjust Curves if needed to further refine the photo.
Set the White Balance
Next up is setting the mood by adjusting the white balance. Most cameras will make an attempt to detect the correct conditions automatically, but with practice and a little experience it’s easy enough to set this manually. This can fix weird lighting, compensate for fluorescent bulbs, change the overall mood, and even make noon shots look like sunsets. If golden hour is just out of reach for one reason or another, turning the white balance up works great in a pinch.
Here’s a pic with a general daylight 5000k temperature, a golden hour shot, and first shot again turned up to 7500k. Compared to the actual golden hour photo, the midday shot is far superior.

5000k midday.

6000k actual golden hour, except the door is filthy.

7500k midday.
Manually setting the white balance in the camera has the added benefit of making edits easier because all your shots will have the same consistent color temperature across the session.
I usually set the color temp on the camera manually for each location and leave it alone. The only time it may need adjusting is when changing locations such as moving indoors, or shooting under vastly different lighting conditions (fluorescent, etc.)

White balance as shot.

White balance adjusted to match series.
When fixing an image, white balance and color adjustments are typically fine to copy and paste to every other image in that session:
Adjust the Temp to set the desired white balance.
Leave Tint alone (usually this is fine).
Increase Vibrance lightly to intensify all of the dullest colors.
Increase Saturation sparingly to intensify all colors.
After setting the color temperature, I will occasionally open the Color Mixer and Color Grading panels to fine-tune specific colors. Perhaps make shadows more blue, or reduce eye-searing pinks, and so on.
Texture, Clarity, Dehaze
These settings are a bit more stylistic – they can smooth out skin, soften edges for a dreamy appearance, and remove fog (sort of like contrast, only more effective).

Texture & clarity turned down significantly.

Texture & clarity turned down slightly.

Texture & clarity cranked way up.
Sharpening
When sharpening, it’s important not to sharpen every pixel in the photo and only target contrasting edges. This is achieved by turning up the Masking. Notice how the eyes and hard features are more defined, and the softer background is largely untouched.
Hold down Alt or Option (⌥) when adjusting the sharpen sliders to see which areas of the image will be affected. Compare the before and after below.
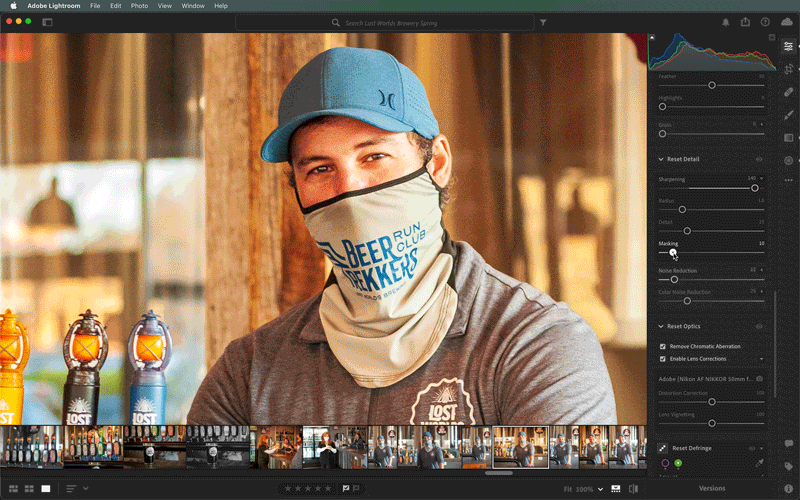
Adjusting the Masking determines the regions of the image that will be sharpened.

Sharpening set to 140, masking set to 10.

Sharpening set to 140, masking set to 90.
lens correction & Chromatic Aberrations
The final bit of tweaking is enabling Lens Correction and removing Chromatic Aberrations. Just two checkboxes, and there’s almost no reason not to. Lenses, especially cheap lenses, will distort images in various ways, and chromatic aberrations often creep into images with strong white/color contrasting edges. Removing aberrations is mostly trivial, but adjust the sliders to fine-tune things.
Wrapping up
I hope this was useful for your photography endeavors beyond the usual rule of thirds and other boilerplate fare. Thanks for reading! Here’s a collection of more images from the shoot.


