

Starfield Outpost Pocket Reference
This is a compilation of tailored information for the enterprising outpost settler. If your ship is busting at the gut with random resources, you’ve managed to run out of copper again, can’t seem to find that unique part for your ship, or simply need a notated map, let this pocket reference be your guide.
I made this for myself as a mobile-friendly handbook of useful vanilla Starfield info. You’ll find lean and simple outpost setups, component recipes, construction guides, star charts, location lists, automation diagrams, and other useful bits—without all the bullshit clickbait and ads.
Note: When applicable, items are presented with weights ▲ or rated to indicate ♦ the overall usefulness. A 5-diamond ♦♦♦♦♦ item is typically the most useful or the item you should readily have on hand, though your needs may vary.
Jump to section:
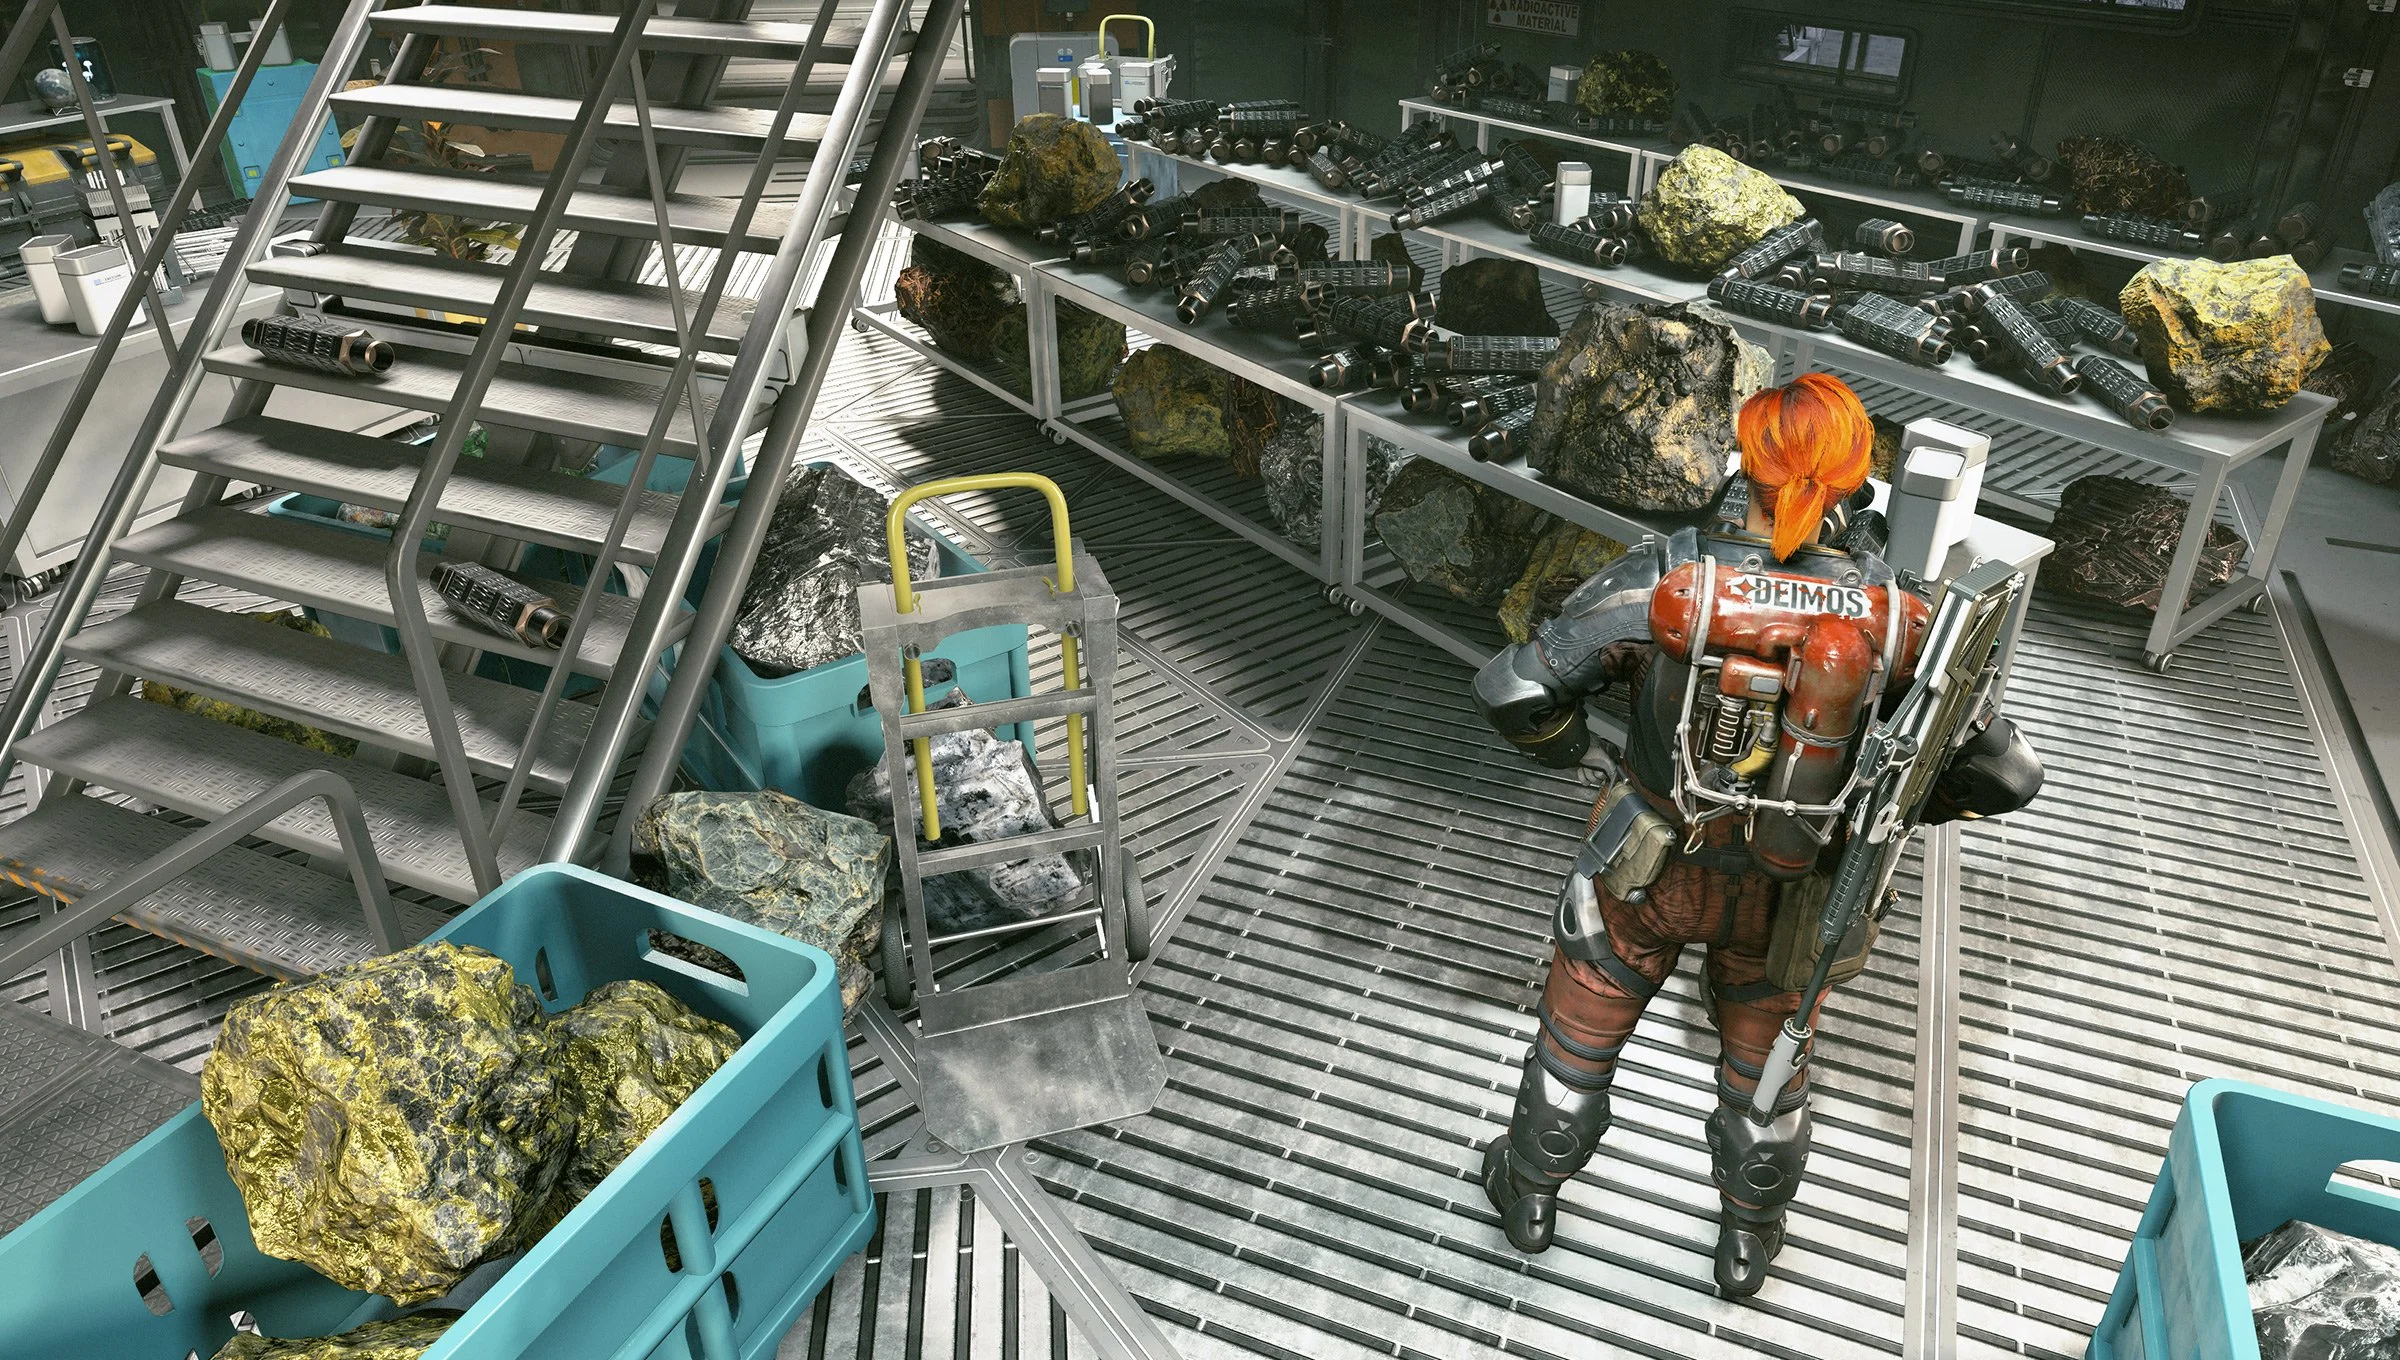
Organic & Inorganic Resources
Keep an eye out for these organic and inorganic materials as they are the building blocks of nearly every new outpost and foundational to most research projects.
Raw elements must be mined with extractors or gathered in the field with a cutter. Organic resources can be grown in greenhouses or animal husbandry facilities—which requires higher tier Science skills such as Outpost Engineering, Botany, Zoology, and Special Projects. This is not an exhaustive list, just the general bulk of what one will be collecting.
For a full list of organics and inorganics on each planet, be sure to check out this amazing spreadsheet Starfield - Resource overview of systems - Google Sheets from Reddit user Admirable-Name-5495.
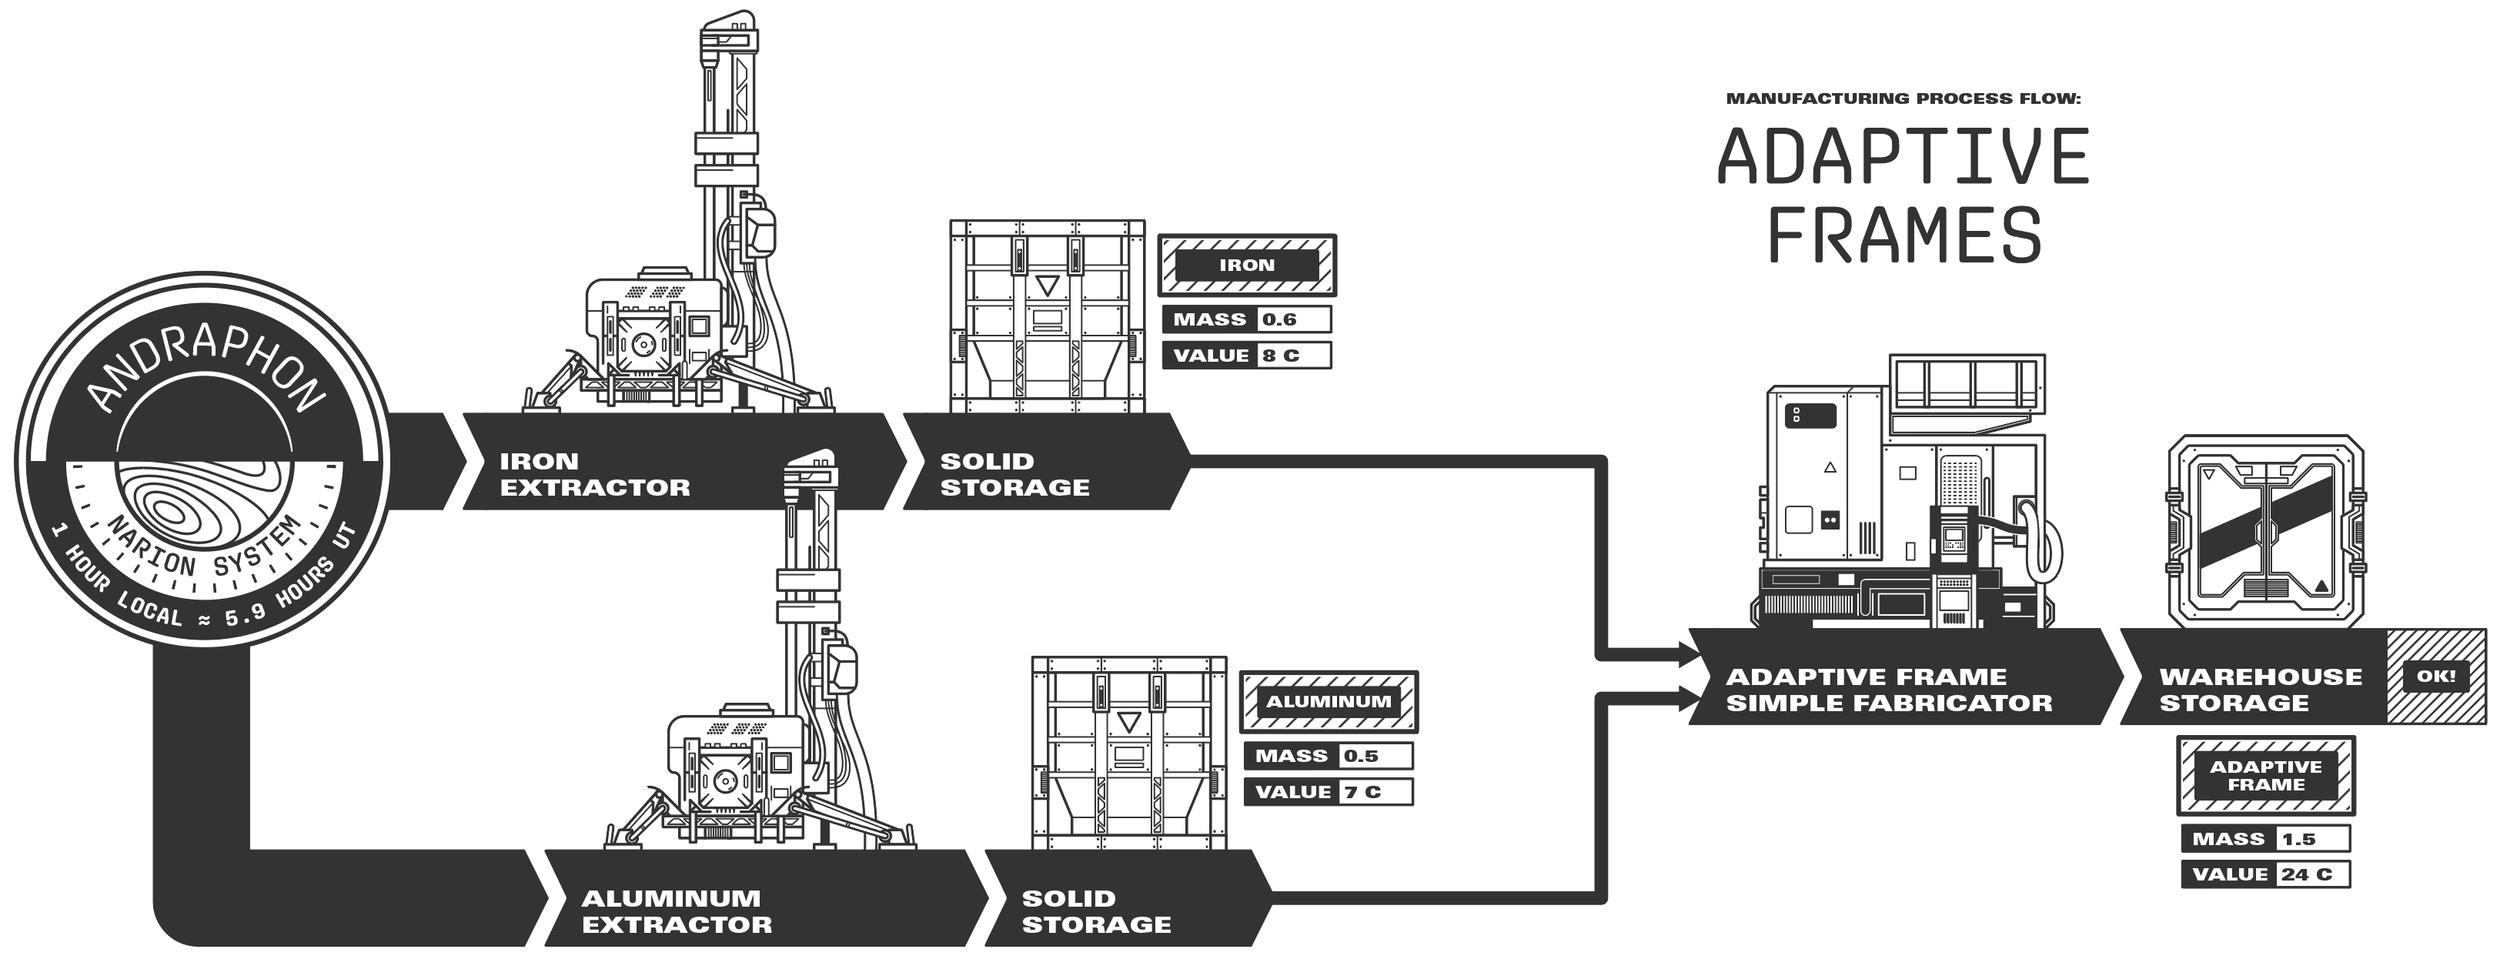
Elements note: Setting up an outpost to produce any combination of these is top priority, with ALUMINUM and IRON first (which combine to create Adaptive Frames; a core building block). Always try to mine at least two elements at any outpost (for efficiency reasons mainly), and many of the above can found together.
Elemental Pull star power: Friendly reminder that the Elemental Pull power will instantly grab any element around you, including those 20-40 Caelumite from gravitational anomalies. They take far too long to collect using a cutter.
Locating iron and aluminum together
It’s almost impossible to mine both aluminum and iron in one place, however, it can be done on Andraphon (moon in the Narion system), Linnaeus IV-b, Serpentis V-d, Bessel III-b, and others. See the diagram below for help locating where to set up an outpost—specifically look for the color change in the biomes—these transitional areas are where multiple elements can be found.

Where the crater biome meets the mountain biome is where you’ll find aluminum and iron.
Diagram showing likely spots to set up an outpost—land in the mountains and look for a crater biome.
Once you locate both resources in the same place, it’s no trouble at all to extract both, feed them into a simple fabricator, and have a warehouse full of adaptive frames. That’s automation!
Rare and exotic (and unique) resources
Investing one or two points in Science > Scanning will reveal more elements from orbit; the rare and exotic and unique resources won’t show up on low level planetary scans. Keep in mind some of the best planets will also require Science > Planetary Habitation to set up an outpost due to harsh conditions.
Crafting Components
Common components are available right from the start—you’ll be making ADAPTIVE FRAMES and ZERO WIRE often. These are craftable at a workbench, which will earn a small amount of XP. More rare components can be crafted automatically using an outposts’ fabricator (no XP reward), or manually at a workbench (earns XP) after investing a few points in the Science > Special Projects skill.
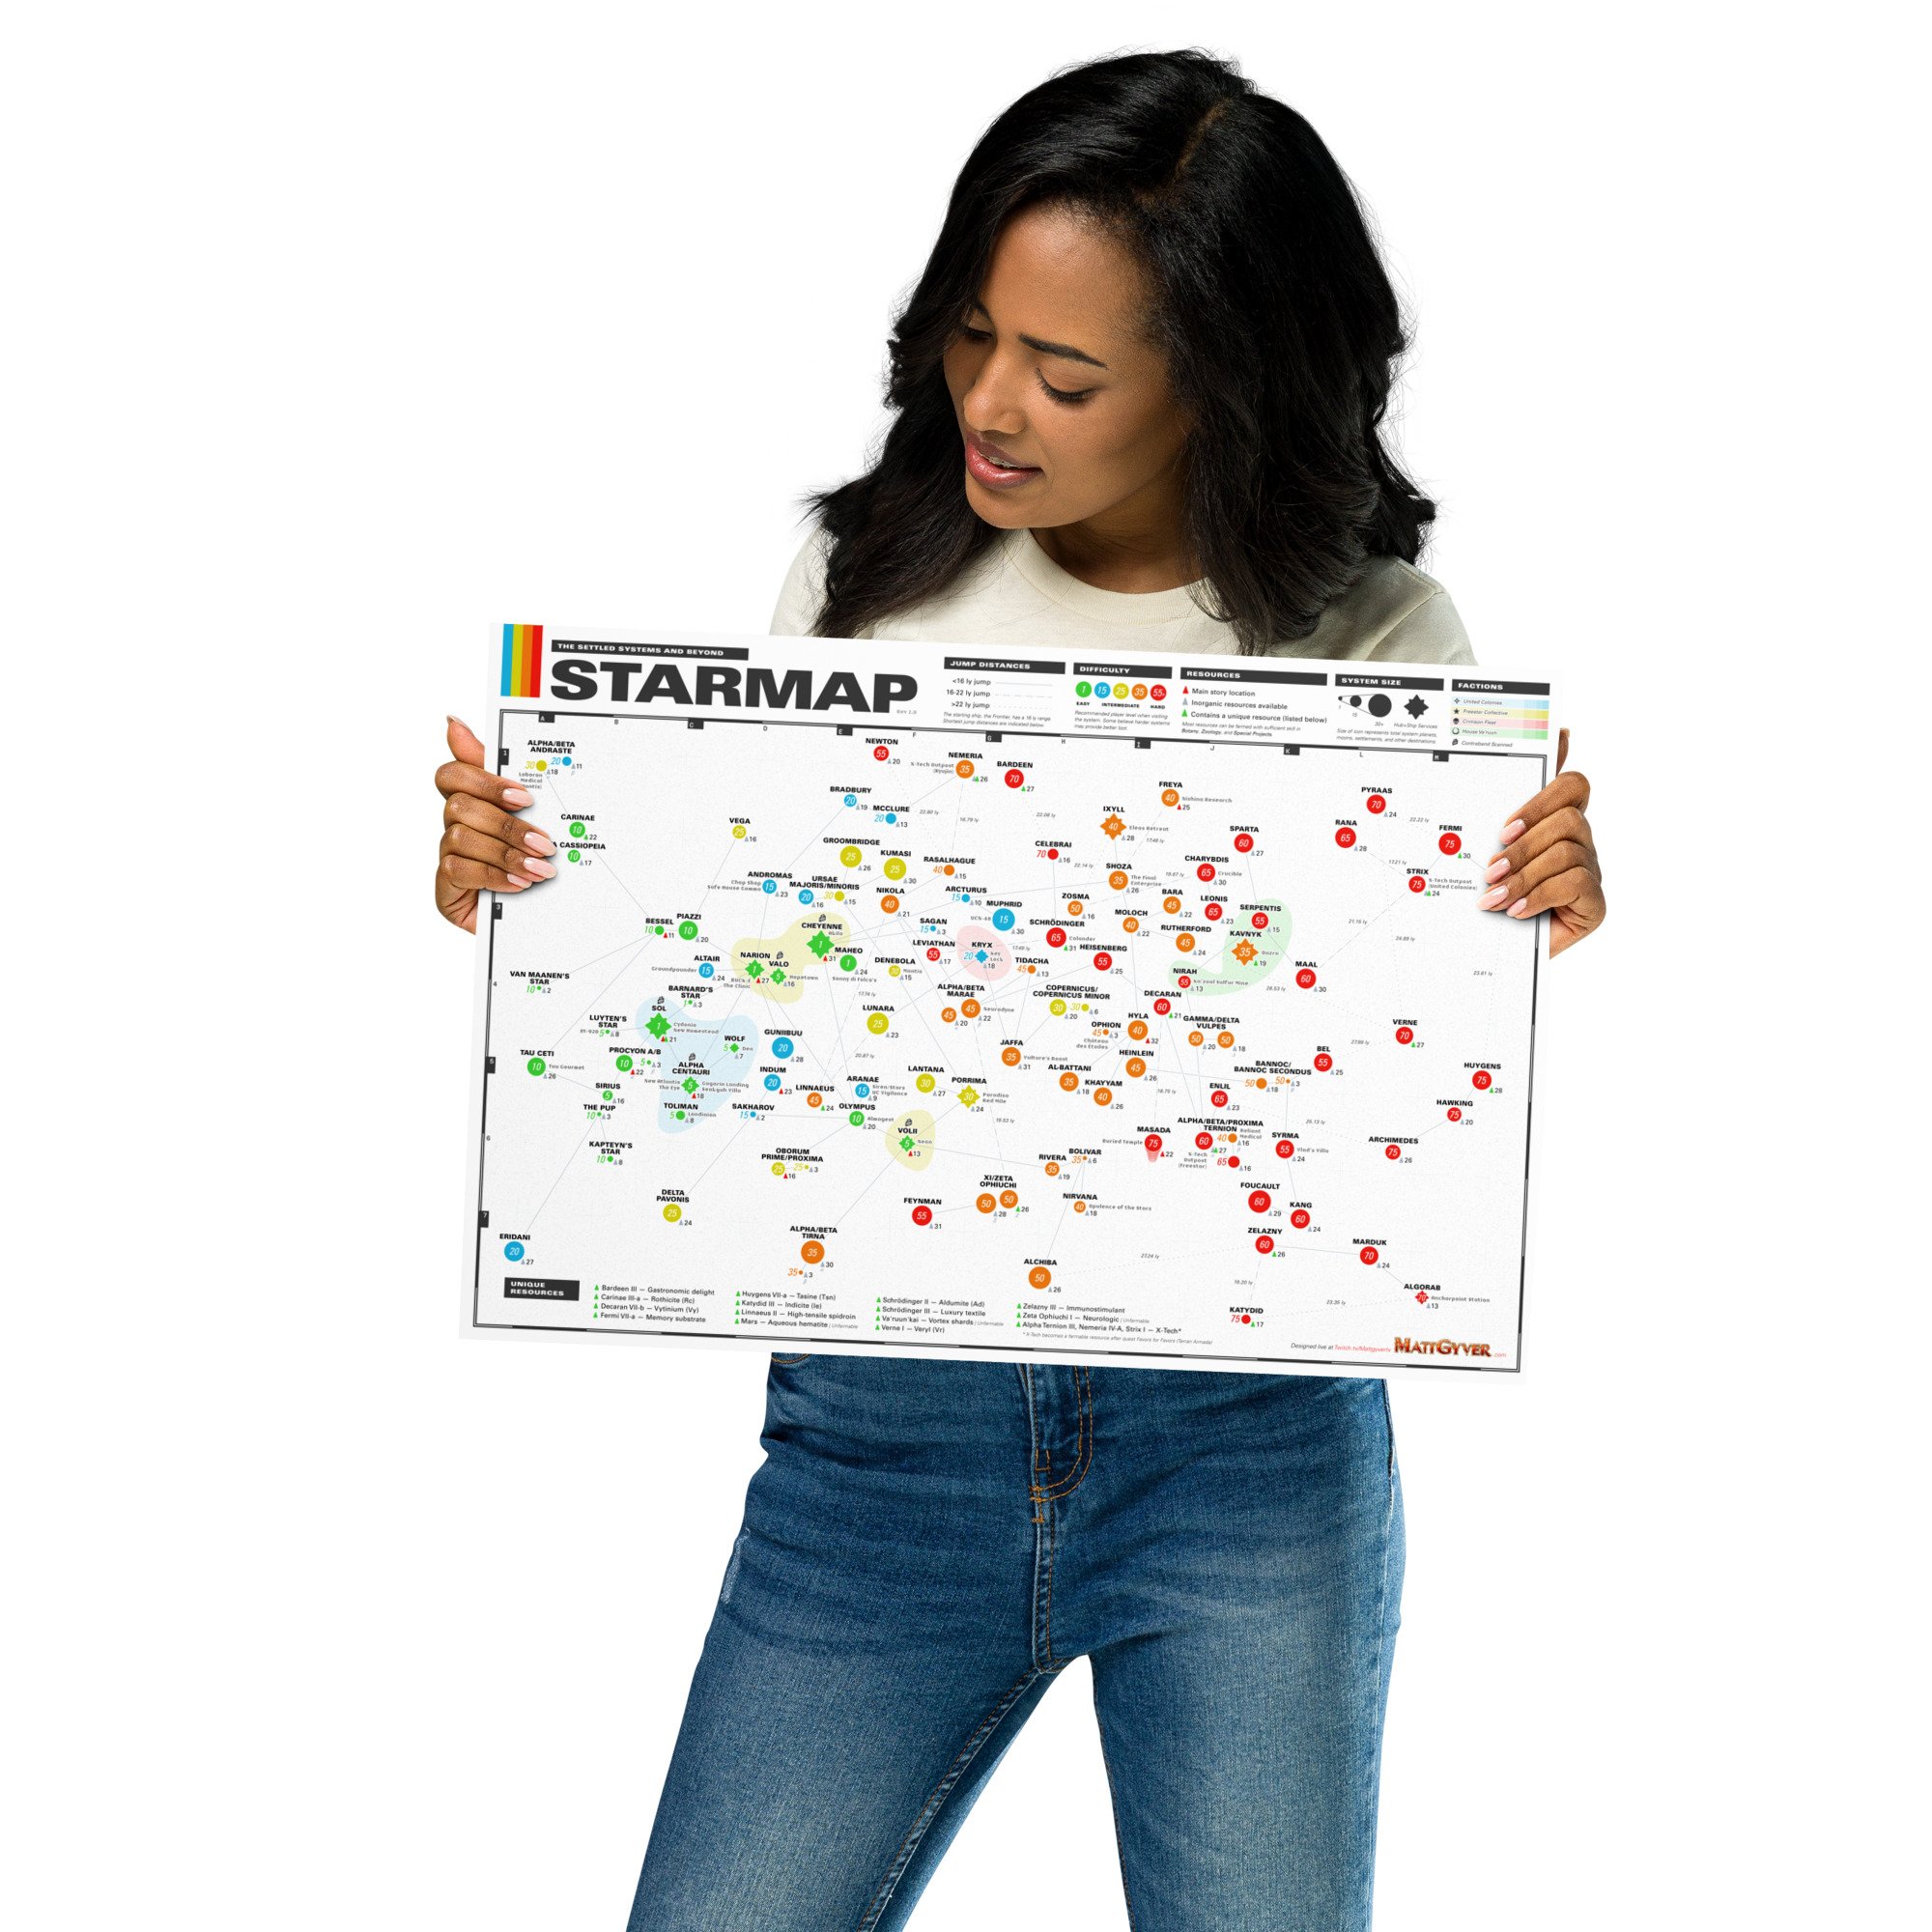
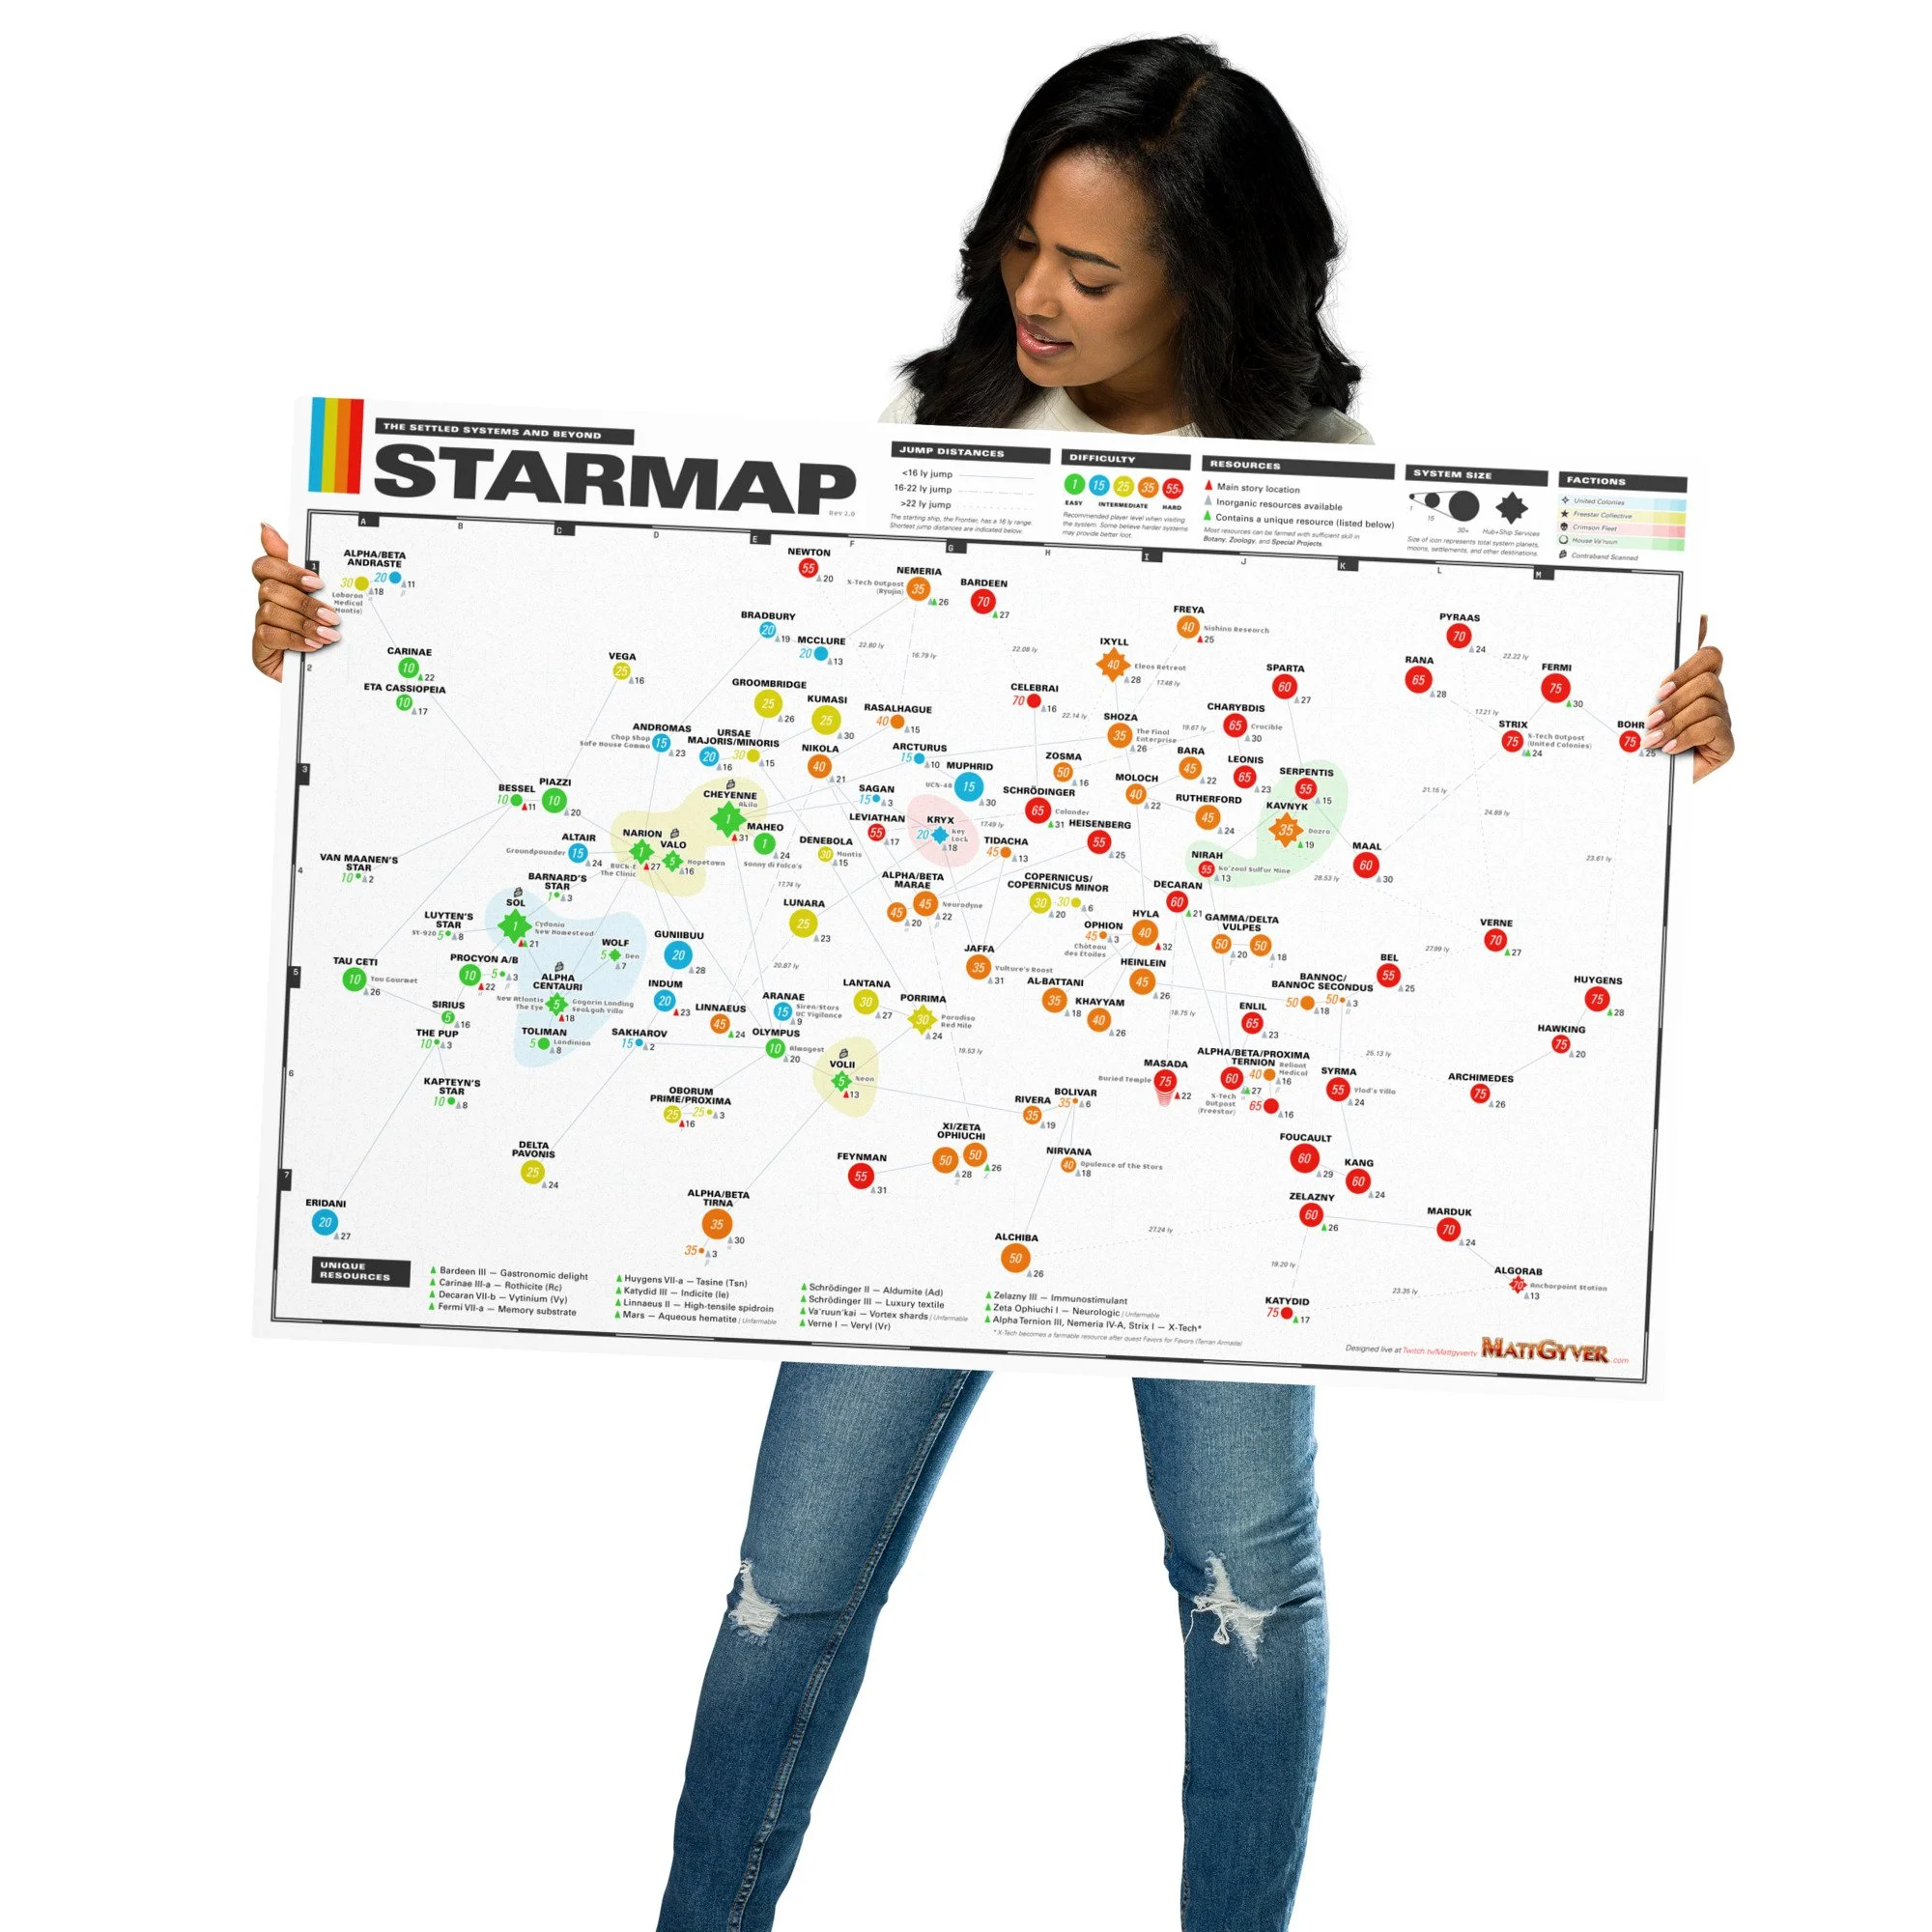
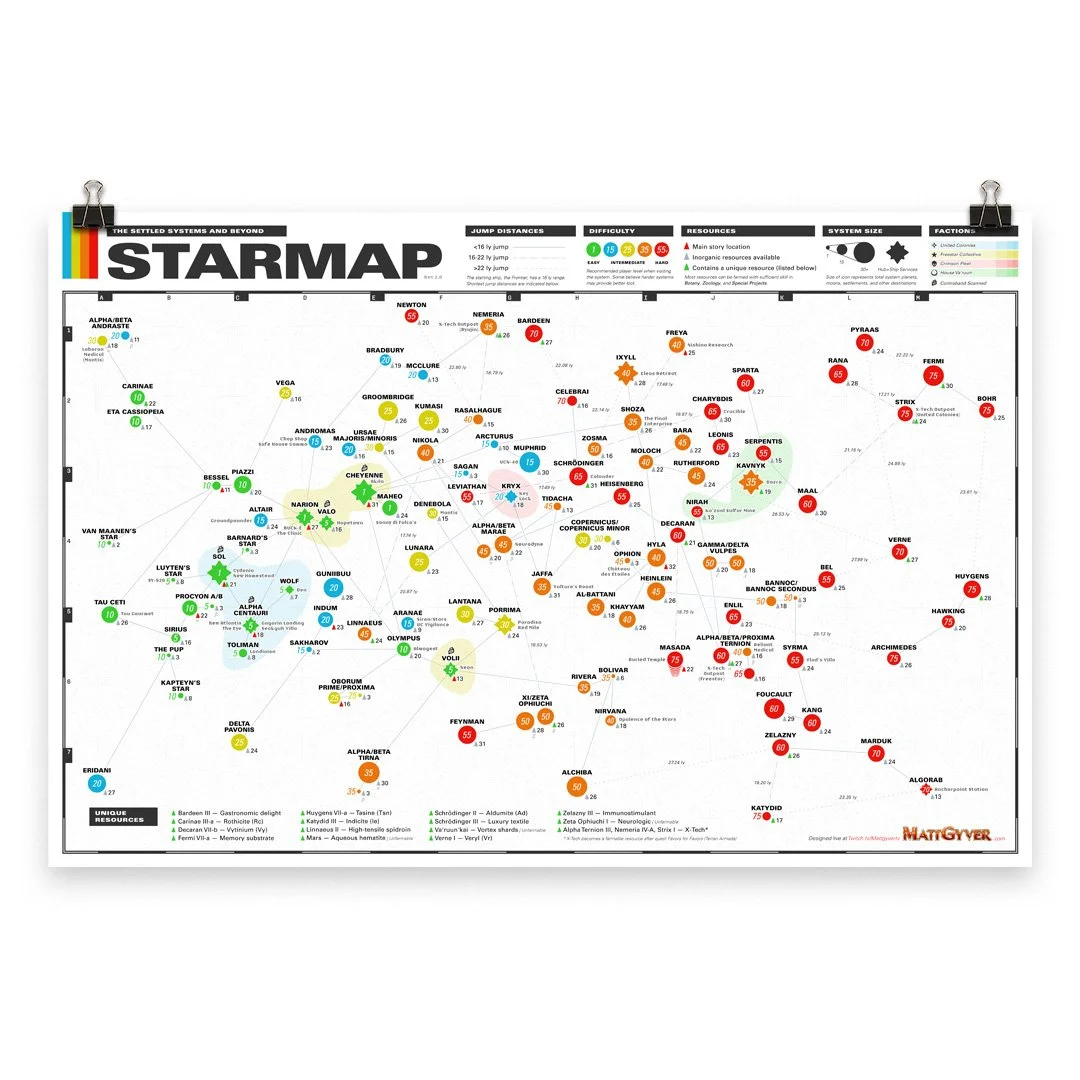
The Settled Systems Starmap
Shucks howdy, space cowboys! Are you experiencing the itch for adventure? With so many places to explore and set up an outpost, the sky is your oyster.
The Starfield map below shows every system, difficulty, size, unique resource, DLC location, faction space, and much more. The jump calculations shown are tailored for a 16 light year jump drive (ala the Frontier). While far from comprehensive, the transit routes provide a useful baseline for navigating with the starting ship. Routing will vary wildly depending on drive capabilities, upgrades, and fuel.

Download a high-resolution 5400×3600 JPG of this map as the white version or the black version, or the full size printable full size PDF.
If you fancy a map for yourself but don’t have the means to print one of the high res versions linked above, both versions are available in the store as large posters, printed in vibrant color on thick and luxurious museum-quality paper.
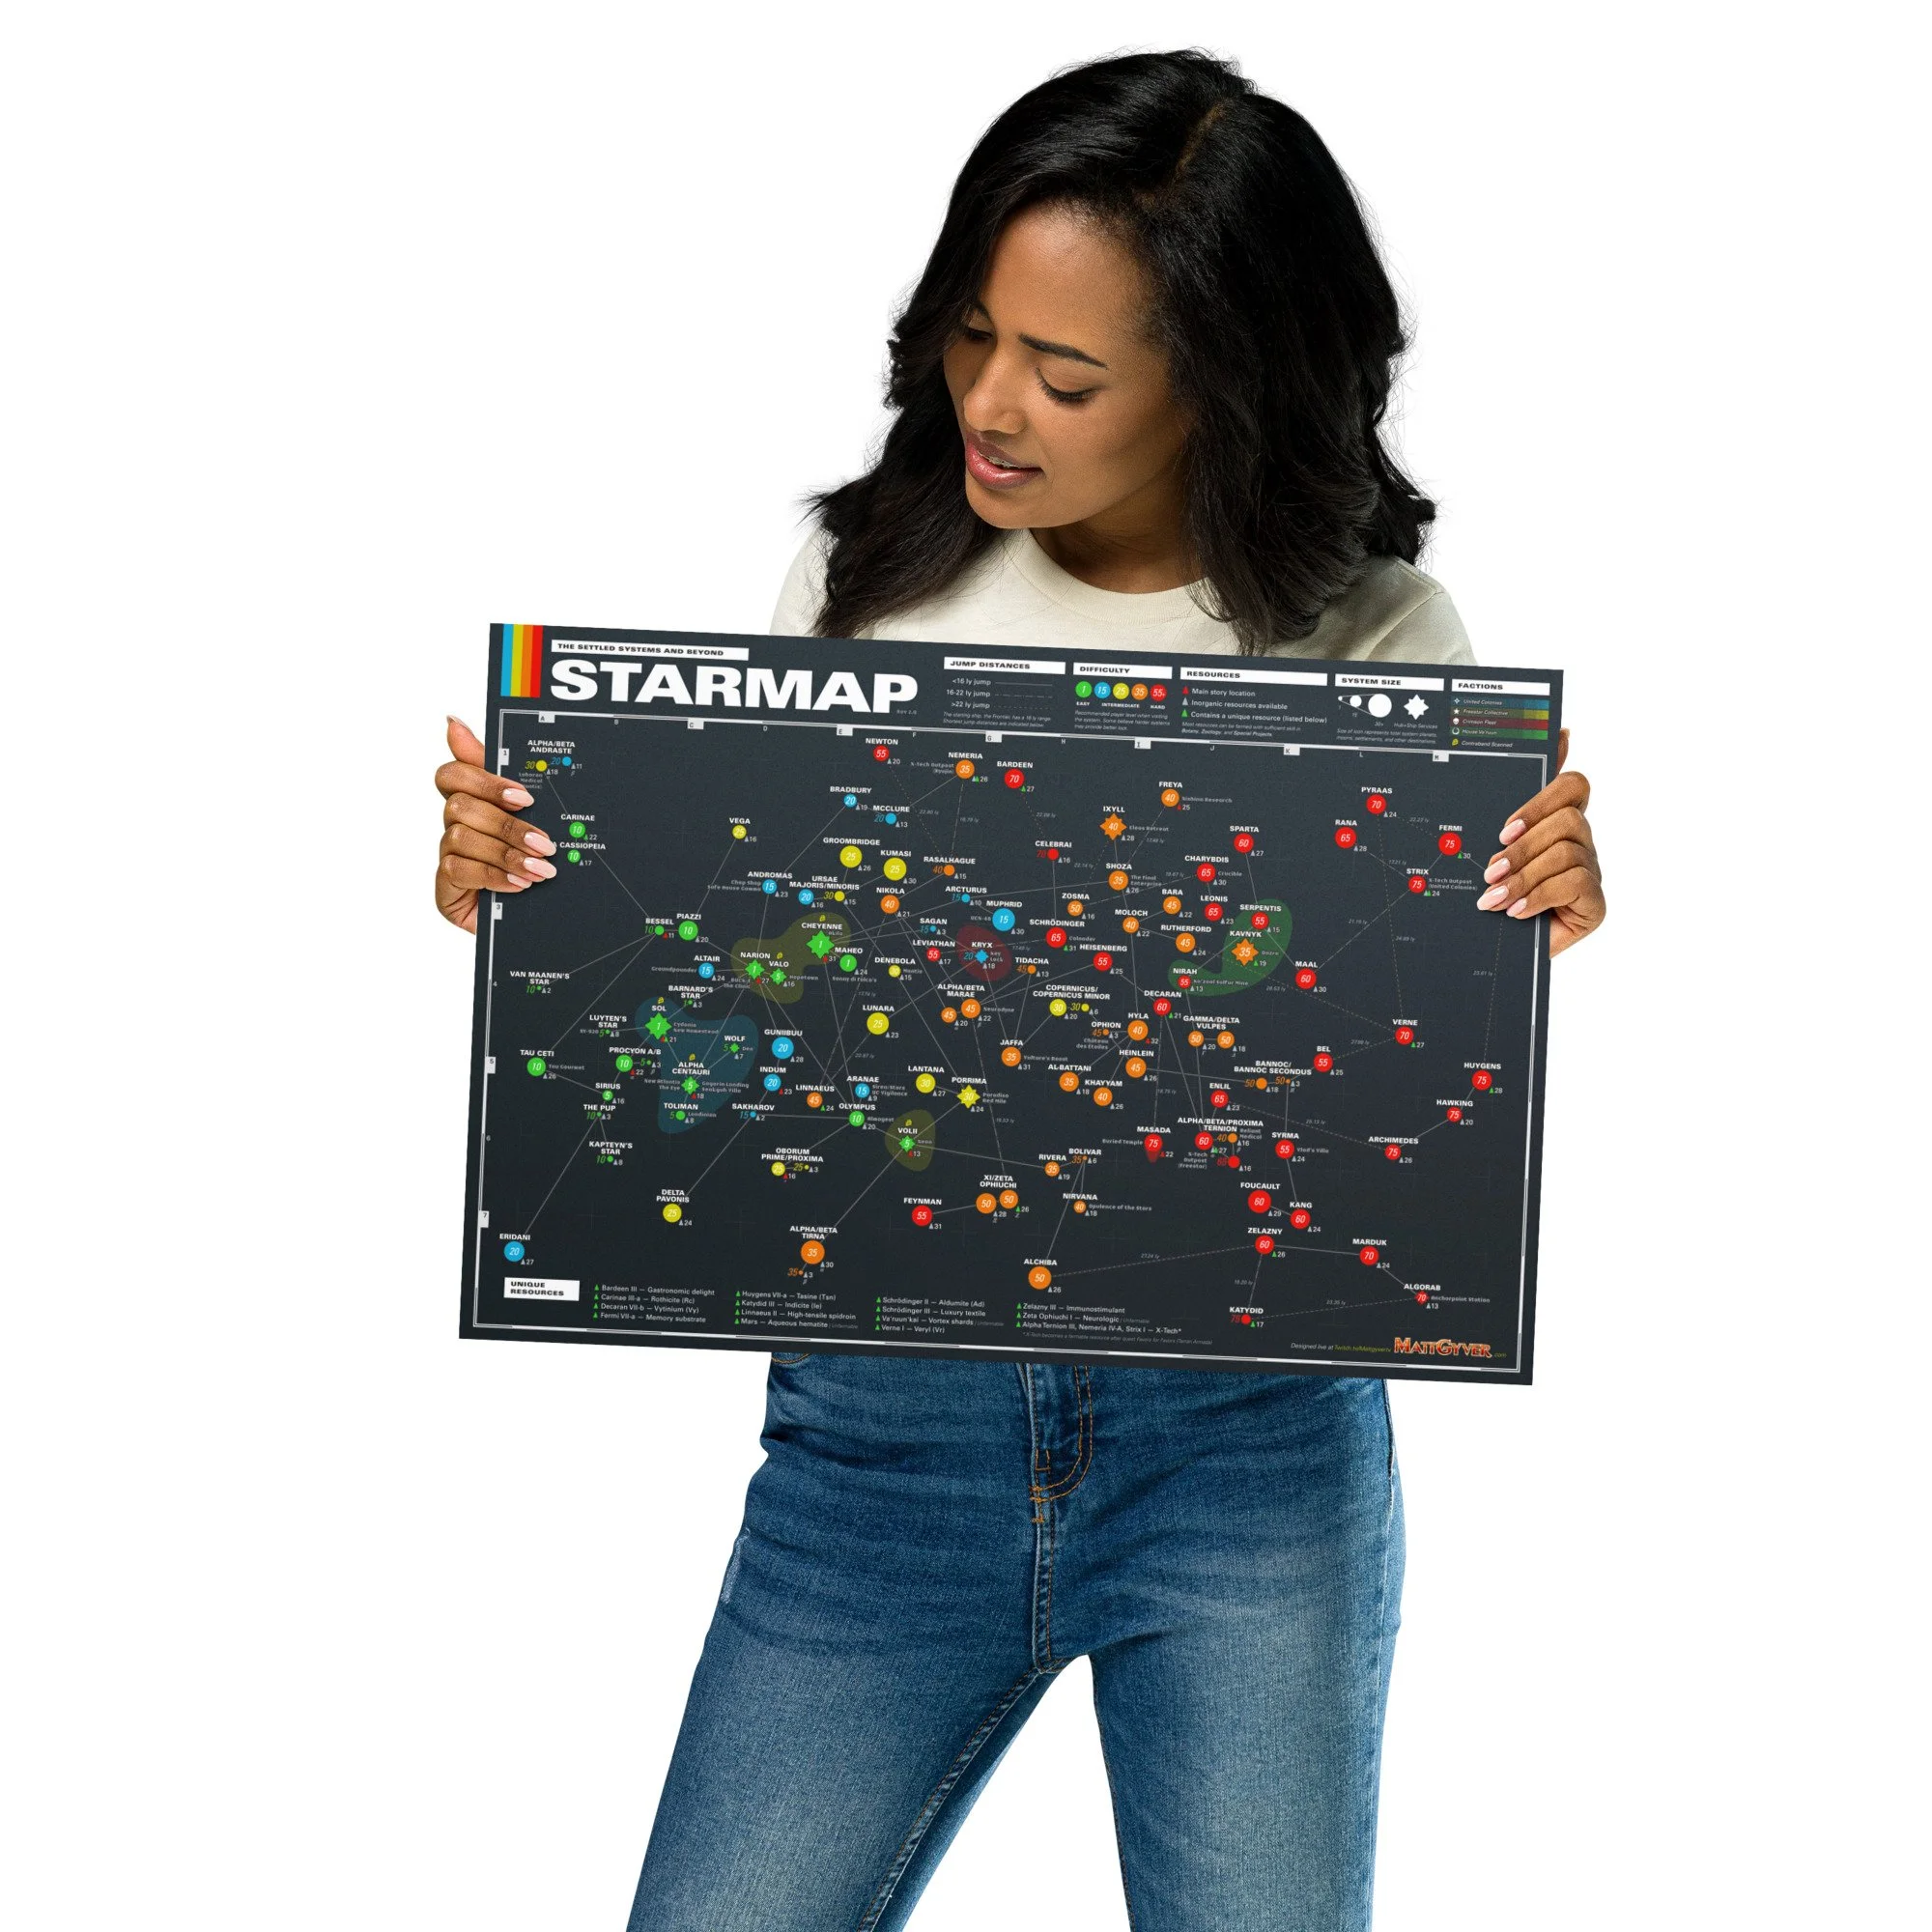


Shucks howdy, space cowboys! Are you experiencing the itch for adventure? This map (as seen on my Starfield Outpost page) shows every system, size, jump calculation, difficulty, resource quantity, notable locations and discoveries, and all unique outpost farming opportunities across the Settled Systems—all printed in vibrant color on thick, luxurious, museum-quality paper.
• Paper thickness: 10.3 mil
• Paper weight: 189 g/m²
• Opacity: 94%
• ISO brightness: 104%
• Paper is sourced from Japan

The Settled Systems
A complete list of the population centers of the known galaxy and settled systems. Every populated area has at least a shipyard—a place to purchase ship parts and build one’s starship. Staryards and showrooms additionally offer brand name, bespoke equipment, including unique weapons, large 3× habs, passageways, cargo bays, and more.

Ideal Outpost Farming Locations
So you want to get the most out of your outposts? With a little effort these 22+ outpost locations will allow one to use Science skills’ Botany greenhouses and Zoology animal husbandry buildings to farm every possible resource in the game, including unique materials like: High-tensile spidroin only found on Linnaeus II, Gastronomic delight on Bardeen III, Luxury textiles on Schrödinger III, and more!
Resources note: There are 2 organic and 2 inorganic resources that can only be harvested manually: Caelumite (found near gravitational anomalies), Aqueous hematite (Cydonia mines on Mars), Neurologic (harvested from a plant on Zeta Ophiuchi I), and Quark-degenerative tissues (random dead alien loot).
Hunting livestock: You can hunt your own farm-raised animals for XP. They will never attack and they respawn. You monster. If two aggressive species are raised next to each other, be prepared for corpses… everywhere. My outpost settlers also exterminate my farm raised foxes every moment they get.
Special thanks to Redditor mistacosplay for assembling this list of 24 Outposts, Every Farmable Resource.
New Outpost Packing List
It’s not uncommon to set up an ad-hoc outpost to mine some rare materials, then tear it down and move on. In order to be up and running quickly, here are some recommended packing lists.
Basic outpost kit
With this basic packing list, you’ll have enough material on hand to throw up an outpost most anywhere. This is all beginner-level tech and doesn’t require fancier or heavier components. Science upgrades provide more advanced options for power, storage, extraction, automation, and fewer material requirements.
This kit will make: 4 solid extractors, 2 gas extractors, 2 liquid extractors, 2 liquid vapor extractors, 10 solar arrays, 10 wind turbines, 4 gas storage units, 4 solid storage units, 4 liquid storage units, 1 hydroponic hab with airlock (I just like the windows 😊), a storage crate for spare parts, a sleeping bag, an industrial workbench, a large landing pad with shipbuilder, a transfer container, and a local cargo link—which will help us connect with any other outposts we might set up in the system.
You can check everything off as you pack 🔥☑️🔥
Packing list (404.4Kg):
For a much more detailed outpost resource requirement calculator, check out this fantastic spreadsheet Starfield - Outpost building worksheet - Google Sheets from Reddit user kestrel_one.
More specialized outpost setup kits
If you’re looking to extract nothing but metals, liquids, or solids, here are some adjusted kits that are a bit more lean and specialized.
Simple metal extraction kit
Craft: 4 metal extractors, 5 solar arrays, 4 solid storage units, 1 hydroponic hab with airlock, a storage crate, an industrial workbench, a large landing pad with shipbuilder, and a sleeping bag.
Packing list (162.5Kg):
Simple gas extraction kit
Craft: 4 gas extractors, 5 solar arrays, 4 gas storage units, 1 hydroponic hab with airlock, a storage crate, an industrial workbench, a large landing pad with shipbuilder, and a sleeping bag.
Packing list (167.7Kg):
Simple liquid extraction kit
Craft: 2 liquid extractors, 2 liquid vapor extractors, 5 solar arrays, 4 liquid storage units, 1 hydroponic hab with airlock, a storage crate, an industrial workbench, a large landing pad with shipbuilder, and a sleeping bag.
Packing list (162.5Kg):
Note on power supplies: Solar arrays are the most common choice for power, but it’s situational. Planets/moons closer to the local star receive much more solar power (usually 6 or even 12). Distant moons receive very little (sometimes only 2).
When 5 wind turbines would be a better choice, bring 25 additional aluminum, 10 cobalt, and 15 nickel.
Fueled generators provide the exact amount of power for the above setups, but require He3 extraction on-site, and are a bit too specialized for a wham-bam-thanks-for-mining-ma’am operation, unless of course you’re mining He3. In that case, bring along 1 austenitic manifold, 1 isocentered magnet, 1 tau grade rheostat, and 4 additional tungsten.
Note on the landing pad: The large landing pad with shipbuilder is important to keep your ship close and avoid the slow, painful walk back to wherever you parked. If the ship doesn’t appear on the pad, use the pad controls to change one’s home ship to a different craft (or simply go to edit mode and cancel), exit the controls, then change it back (or change the color of a ship part and save if you don’t mind everything going into cargo). Your ship should now be on the pad (maybe glitched into the pad). A save and reload should fix everything if that happens. Either way, you’ll be able to transfer materials into the cargo bay from your inventory and fast travel away.

Automating Resource Production and Fabrication
If you crave the factory life of an industrial revolution child, setting up fabricators or automating resource flows to churn out materials should satisfy your hunger. You won’t earn XP, but the real reward will be the advanced materials you didn’t have the skill to make at a workbench.
Be forewarned, you might want to keep a notebook for more complex crafting setups. Fabricating unique parts requires fairly large resource chains across multiple systems.
Simple On-site production of Luxury Textiles
This is the setup for automating production of luxury textiles which can only be farmed on Schrödinger III. No extended resource chain is required; everything can be created at a single outpost. It’s important to first fully scan all flora and fauna on the planet to enable the various material components for production at greenhouses and animal husbandry buildings.
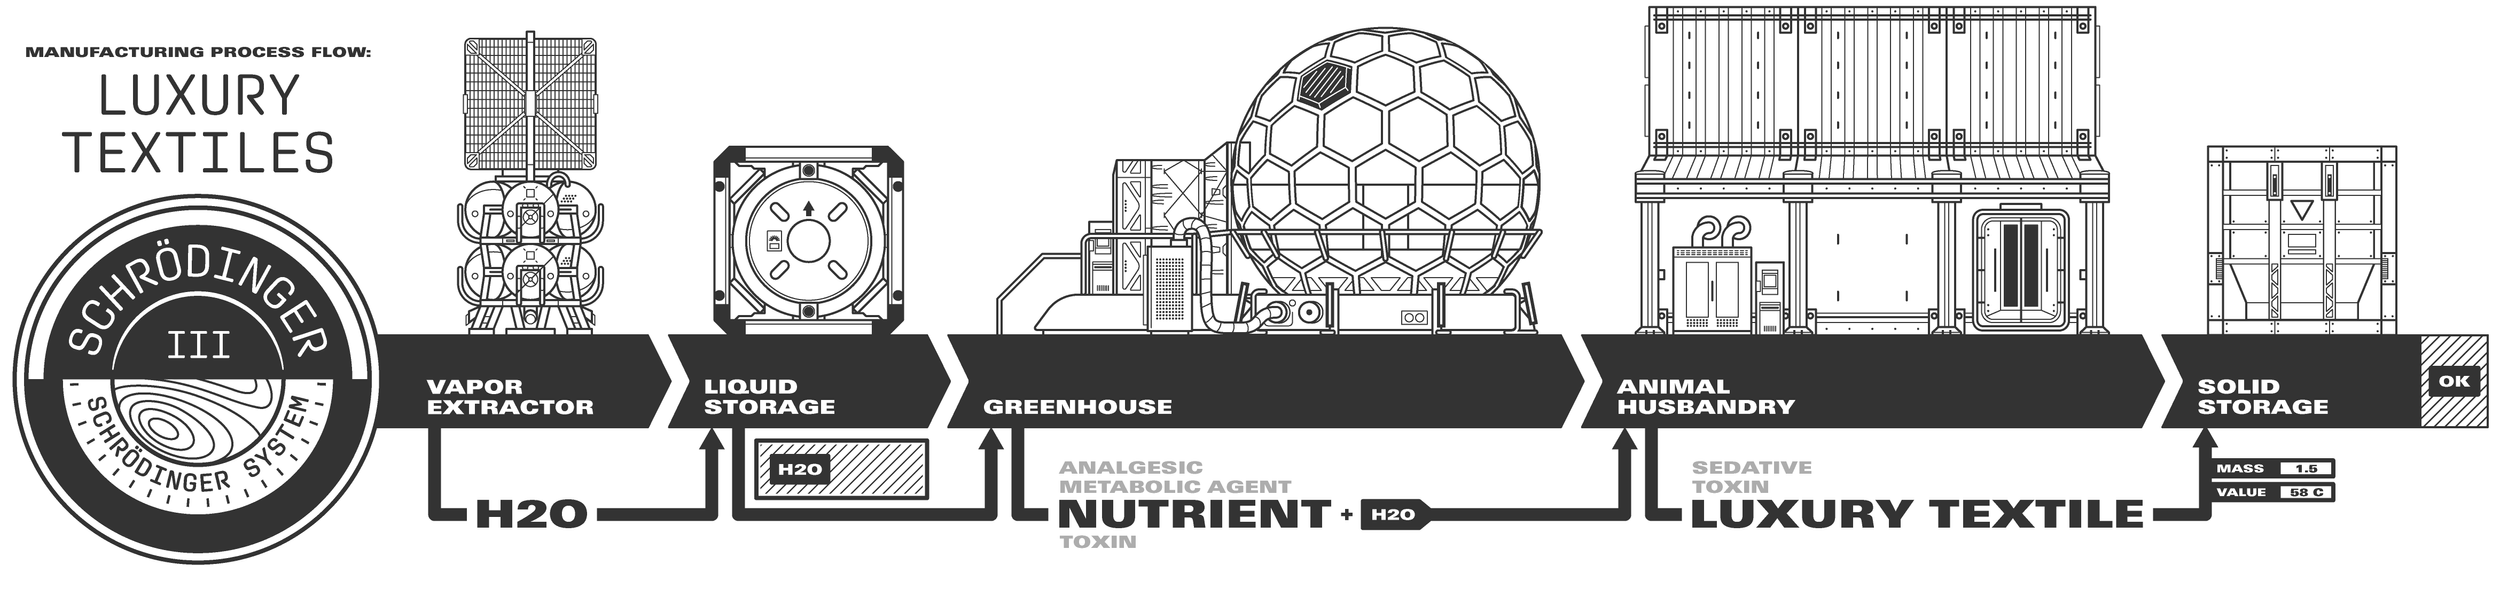
Water Vapor Extractors—H2O is the resource required by greenhouses to function. Water extraction devices are available in either the vapor or solid variety. Connect the output to a liquid storage unit.
Liquid Storage—A liquid storage unit helps maintain a reservoir of H2O. Connecting multiple water extractors will maintain a steady supply of water. Connect the output to the greenhouse.
Greenhouse—The greenhouse uses water to produce nutrients (or other resources). H2O will also pass through the greenhouse with the nutrients when connected to an animal husbandry building.
Animal Husbandry—Using the nutrients and H2O from the greenhouse, the animal husbandry building will produce a steady supply of luxury textiles (must have 100% scanned the Swarming Foxbat creatures). Connect the output to a solid storage unit. It’s notable that each building can serve as a hab, capable of being filled with equipment, furniture, crafting stations, and anything else that will fit (though they are not environmentally sealed).
Solid Storage—Luxury fabrics will continue to fill the solid storage unit until it’s full, eventually halting production. Linking additional storage units in the production chain will help store surplus materials (such as between the greenhouse and animal husbandry building to stock nutrients).
Local System Production of Memory Substrate
This is the setup for producing large quantities of memory substrate, which can only be farmed on Fermi VII-a. It’s used to make substrate molecular sieves (aka Molecular Steve) which is a component for industrial greenhouses and animal husbandry buildings. The challenge with this resource is that both water and fiber must be shipped in from Fermi III to produce it at scale; no other planets in the system provide both resources.
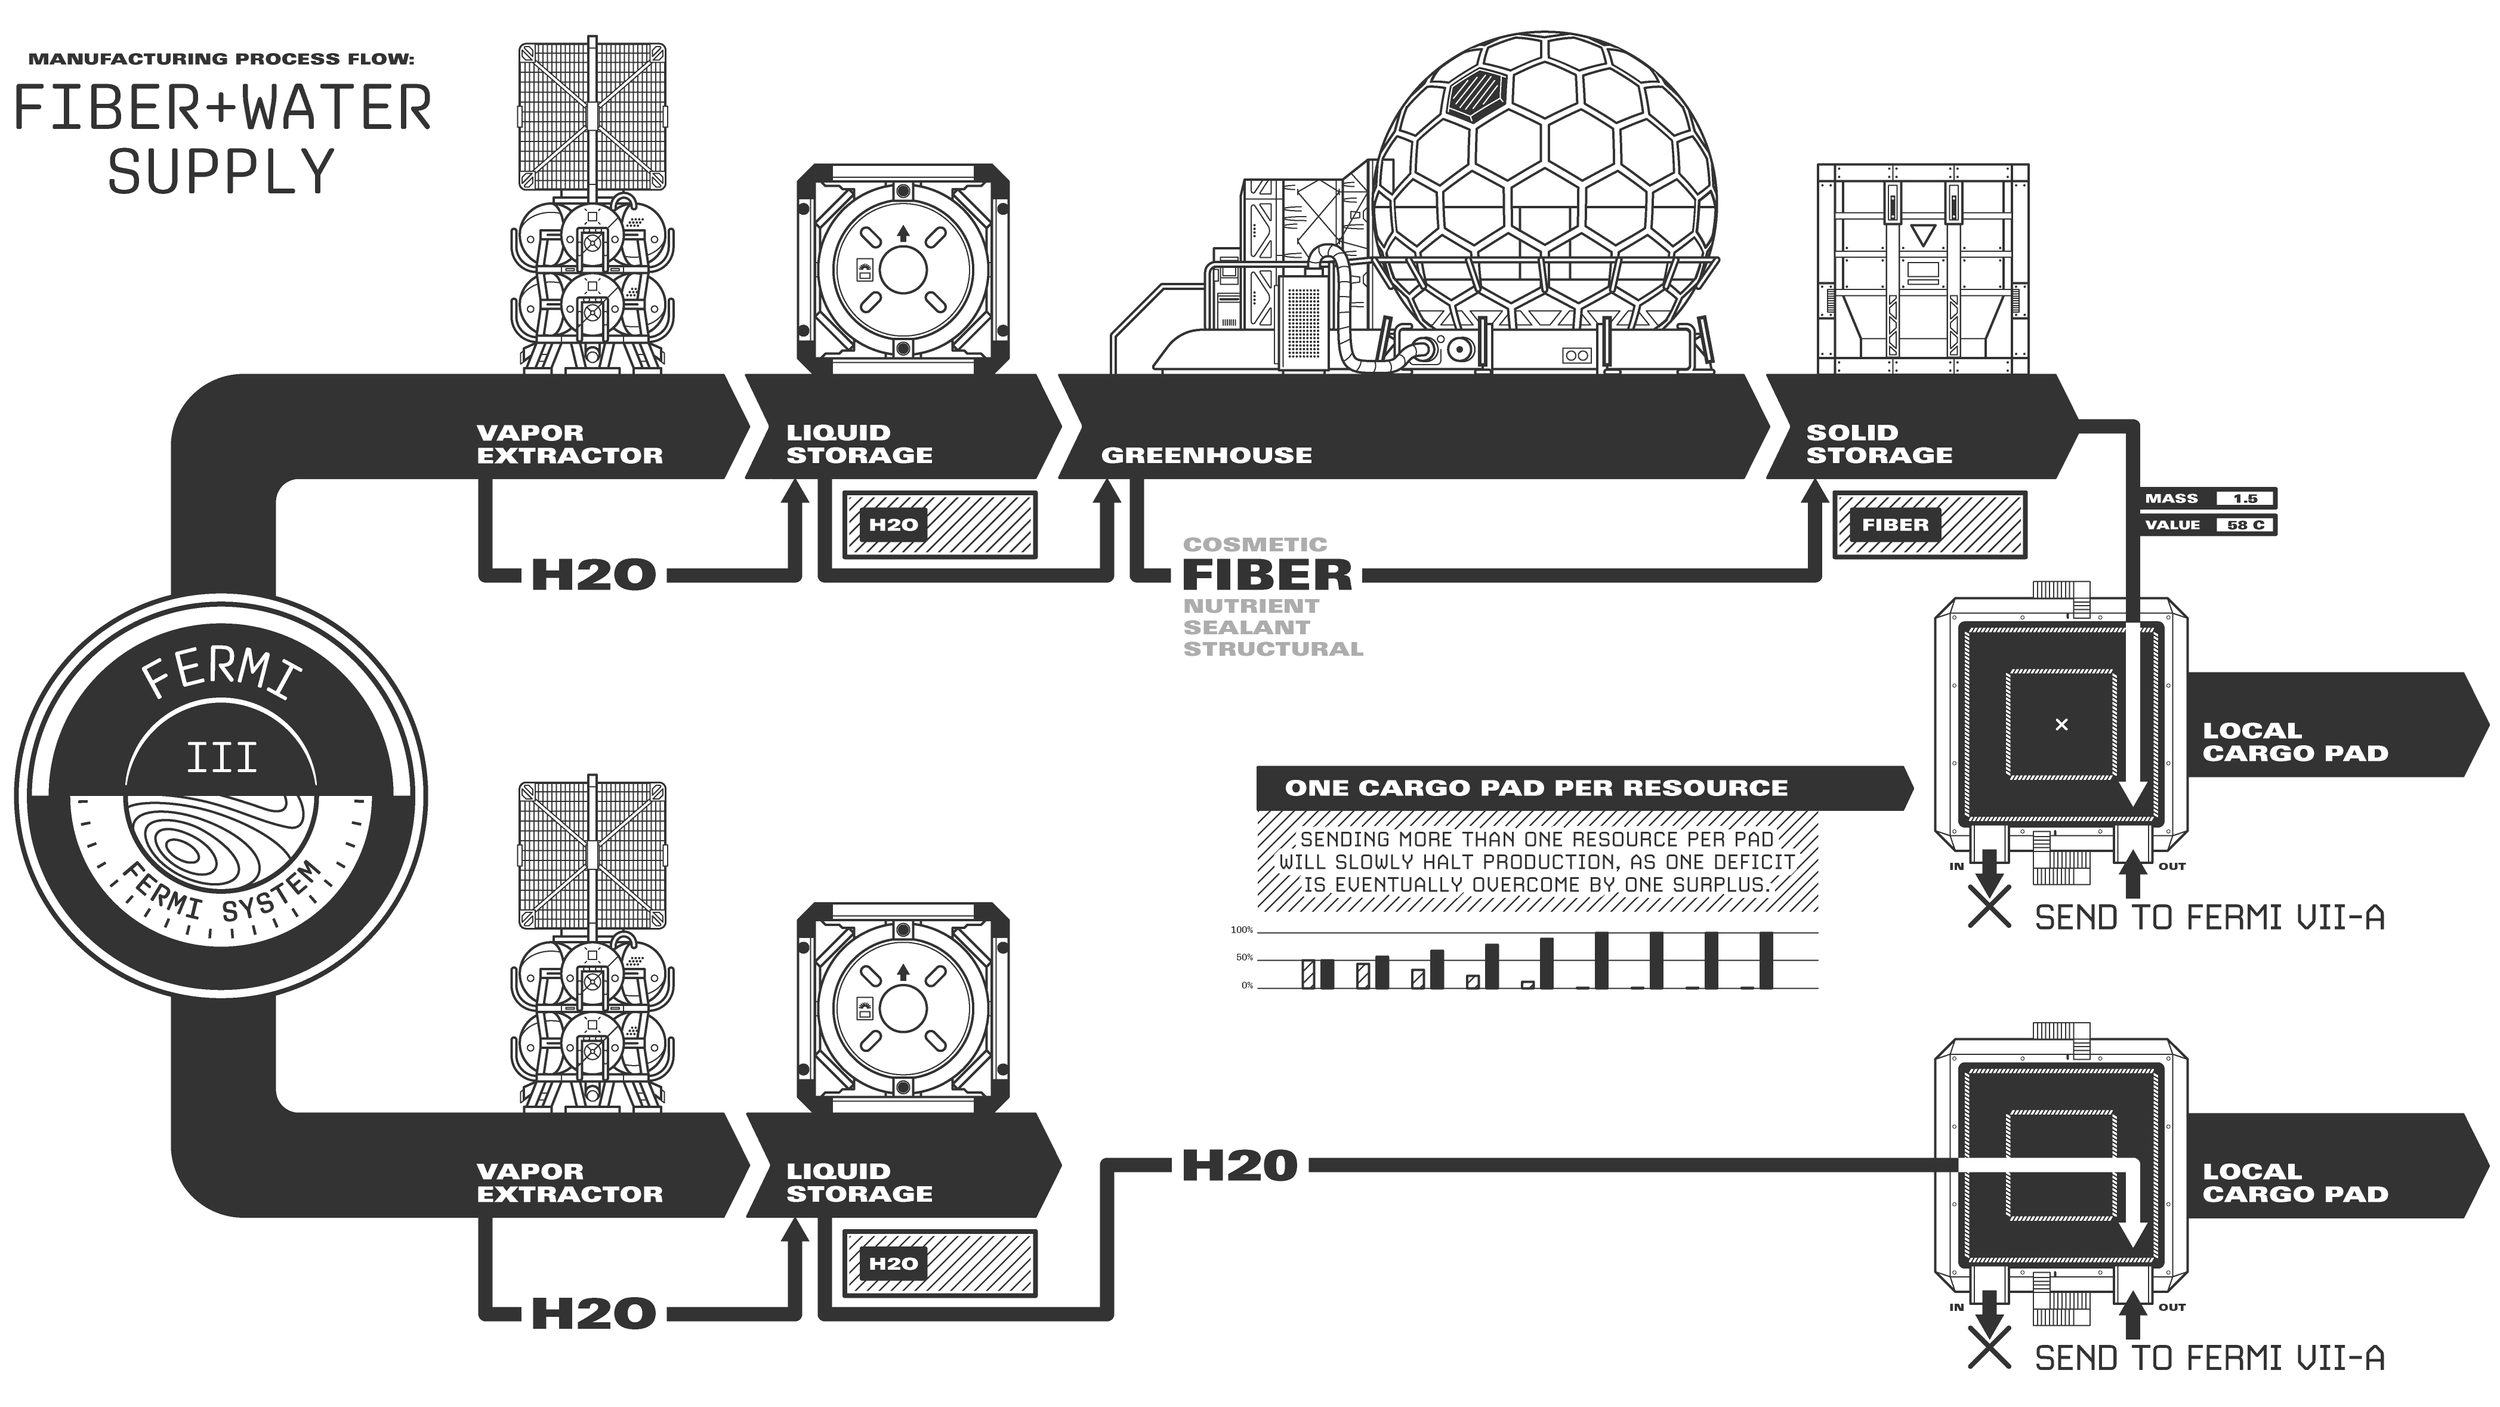
Shipping materials off-world via local cargo pads is streamlined by shipping only one resource per pad. The needs of the memory substrate are such that it requires more water than fiber, so the shipments become unbalanced quickly. Shipping multiple resources from the same cargo pad will eventually create a deficit which is then clogged by a surplus—becoming more pronounced each cycle—eventually halting all production until you unclog the situation. Everyone needs more fiber in their diet, cargo pads are no exception.

Using the fiber and H2O from Fermi III, the animal husbandry building on Fermi VII-a will produce a steady supply of memory substrate (after 100% scanning the local Herding Nautiloos Filterer—a floating brain-like creature).
Complex Intersystem Production of Vytinium Fuel Rods
Let’s talk about vytinium fuel rods, the holy grail of crafting in Starfield. Primarily used to power advanced nuclear reactors, these components fetch a hefty sum at most stores, and more importantly, give 10 XP each when crafted. Devilishly difficult to maintain, and tedious to set up, crafting vytinium fuel rods en masse will reward the player with lots of levels and cash (assuming they can smurf the goods across the settled systems). This manufacturing process flow is solid, stable, uses only seven outposts, and should scale up to any operation… or until your game crashes and PC/XBOX catches fire.
A word of warning though! Intersystem cargo links are buggy. Outposts are buggy. This should operate wonderfully for a few cycles at least, but your mileage may vary. While building this, my helium-3 outpost decided it didn’t want to exist anymore—every extractor and power source was broken/red and the outpost beacon no longer showed on planet scans. I had to land nearby then find and destroy the outpost marker and start over. In other systems cargo links would appear to operate (pad lights blinking yellow) but a cargo ship would never arrive. Here’s how intersystem He3 delivery looks when it looks when it works. It took me… well, let’s not talk about how long this took to get running (8 hours 😖).
Enjoy!
Vytinium fuel rod crafting and logistics chart. Grab this diagram (and many more) in the full-size broadsheet newspaper print in the store.
The seven required outposts are:
Grimsey (Narion system). Your new home in the Narion system; crafting vytinium fuel rods, nuclear fuel rods, and indicite wafers will happen here.
Kreet (Narion system). The finest provider of helium-3 and silver in the Narion system.
Cruth (Narion system). The heart (and bottleneck) of everything. Cruth generates the semimetal wafers used in a couple components via fabricators.
Dalvik (Narion system). Provides caesium for the operation.
Katydid III (Katydid system). Imports a steady supply of raw indicite.
Decaran VII-b (Decaran system). Imports a steady supply of raw vytinium.
Codos (Cheyenne system). Imports solvent, the source of it being uniquely craftable at a greenhouse with minimal effort.
Vytinium Fuel Rod and Outpost Build Notes
Take it slow, build each part one step at a time. The whole thing looks crazy and complicated, but it’s separated into bite-size pieces and diagrammed as such. Print it out and follow along with the notes. You got this, you can do it!
Establish Kreet first (in the Narion system). Helium-3 is the life blood of any intersystem manufacturing process. By amassing helium-3 while constructing other outposts you’ll build a solid He3 stock while the rest of the network is set up. The helium-3 here is atmospheric, so vapor extractors can go anywhere. Place as many as possible.
Kreet energy requirements are steep! Consider dropping a nuclear reactor or an advanced nuclear reactor here to power the maximum amount of He3 extractors possible. Solar and wind power are very underwhelming for the amount of energy needed.
Kreet will have three intersystem cargo links (and one local link), you’ll want at least four helium-3 extractors per intersystem cargo link: three or more extractors for shipping and a separate one for powering the cargo pad. A healthy amount is needed because each pad will both be powered by and export He3. Be sure to have plenty of gas storage for each so the extractors won’t be outpaced, and balance things with interconnected storage as needed.
Save and load often! After setting up cargo pads, and after linking cargo pads, saving and loading to make sure they ‘stick’ and may help to avoid issues.
The second outpost established should be Cruth, also in the Narion system. This is another complex setup requiring fabricators and several kinds of extractor. Power requirements are also fairly steep. Have a reactor or advanced reactor handy because the solar power here is terrible.
Cruth relies on Kreet with a local cargo link to import silver—an essential element to manufacture zero wire—wire it up now with Kreet to begin importing silver. Other than that, it’s important to find a location with gold, antimony, and copper. Emphasis on antimony since those extractors have very large footprints, be sure to choose a large plot.
Cruth will likely be the bottleneck. This location relies on several elements and two fabricators in series. Scale the production based on your needs and available materials, but you may want a few basic fabricators for zero wire, and several compound fabricators to handle the zero wire+antimony+gold conversion into semimetal wafers.
Set up Dalvik, the easiest outpost to setup for caesium. Nothing more to do here.
Build your new home outpost on Grimsey—the desolate, volcanic, radioactive, hellscape (it’s really not that bad). You will be extracting plutonium and uranium here and importing all the materials needed to hand-craft vytinium fuel rods, nuclear fuel rods, and indicite wafers. The main goal is to set up three intersystem cargo links and two local cargo links. Link local Dalvik and Cruth and start importing caesium and semimetal wafers. Storage is important, the more storage you have for incoming cargo the more you can craft en-masse.
Set up extrasolar (non-Narion) locations last. Katydid, Decaran, and Codos are fairly straightforward. Establish the outpost, build two intersystem cargo links each (do not link them yet), and start extracting the materials into containers. Notable that Codos uses a greenhouse to make solvent, the only place in the settled systems that can do this.
Wire one cargo pad at each outpost. An outgoing container at each outpost should be wired to begin filling with indicite, vytinium, and solvent respectively. Connect those pads to the Grimsey outpost. They won’t operate without helium-3, but wire them anyway and watch the cargo ship land. The other pad will be sitting there, watching, waiting, hungering for helium-3.
Finally, head over to Kreet. Begin connecting intersystem cargo links for realz, one at a time, like this: connect a helium-3 supply stack to a pads’ outgoing cargo and to its He3 supply/power container. Wait for the cargo ship to land. Connect the cargo link to the Codos outpost from the control pad. Wait for the cargo ship to take off and leave. Wait for the cargo pad lights to turn solid green after the ship leaves atmosphere. A save and load may be a good idea here.
Now travel to the destination on Codos, and watch the incoming intersystem pad. The lights should be blinking yellow indicating a cargo ship is inbound. After a short while, usually no more than 5 minutes, the lights should blink yellow rapidly. This means the inbound cargo ship is entering the planet’s atmosphere and should land momentarily. Once it lands, consider the link a success (if it doesn’t, try a save and load here too, or destroy the connection and try again). Connect the inbound Kreet cargo container loaded with helium-3 to the other intersystem cargo link’s He3 supply. The solvent cargo ship on Codos will now have the helium-3 it needs to head over to Grimsey. Both ships will leave. Watch the pad lights—don’t leave the scene until the lights are green. Once the lights are green and ships are en route, head to Grimsey and verify the incoming solvent resources arrive. Once they do, the Codos branch should now be established.
Repeat the intersystem connections for indicite and vytinium: establish the intersystem link from Kreet, watch the ship arrive, watch it leave, make sure the lights are green and head to the destination to watch the ship come in. It’s romantic, bring Andreja or someone. Link the incoming helium-3 cargo to the outgoing helium-3 supply and watch the newly powered indicite or vytinium cargo ship leave the system. Fly to Grimsey and confirm the materials arrive there. It’s notable I had to repeat the process once or twice to get it to stick by killing the links across the branch: Kreet—Katydid—Grimsey and reset them: Katydid (indicite pad) to Grimsey, Kreet to Katydid (He3 pad), Katydid (He3 pad) to Katydid (indicite pad). 🤷♂️ Cargo links are buggy. Outposts are buggy. Never forget.
All local and intersystem cargo links should be established. Barring any glitches or further wackiness, cuddle up to an industrial workbench on Grimsey and craft as many indicite wafers as possible, then balance the remainder of the resources to craft nuclear fuel rods and vytinium fuel rods.
Profit. My first batch with minimal extractors and simple proof-of-concept setup netted 250+ vytinium fuel rods. They each have 11 mass and a listed price of 836C. Not easy to haul around, and I’ll be spending several 24-hour waiting periods refreshing vendor cash.
Sleep Good; Pass the Time at 1:100 UT locations
If you want to speed things along, why not spend an hour sleeping on Venus—where 1 hour local is 100 hours UT. Whether sleeping at an outpost or just on your ship, you’ll top off every single manufactured item and extracted mineral at every outpost, almost instantly.
Here are all the planets and moons with this 1:100 time dilation; pick one closest to you and have a snooze:
Intersystem helium 3 connection at the Decaran outpost producing vytinium.
Intersystem helium 3 connection at the Katydid outpost producing indicite.
Codos outpost in the Cheyenne system makes solvent in greenhouses; the only place in the settled systems that can.
He3 production on Kreet with three intersystem cargo links to feed the Decaran, Katydid, and Codos outposts.
Zero wire and semimetal wafer production on Cruth, using silver from Kreet, travels through a gauntlet of fabricators and leaves on the opposite cargo pad.
A modest proof-of-concept haul of 250+ rods from my fuel rod production diagram using only 7 outposts.
If you thought that was intense, head over to my advanced reactor manufacturing flow diagrams article and check out how to produce this, and every other advanced reactor part using less than 24 outposts.
If you want a physical print of the vytinium fuel rod schematic (and many others) as a stunning 12-page broadsheet newspaper, look no further!
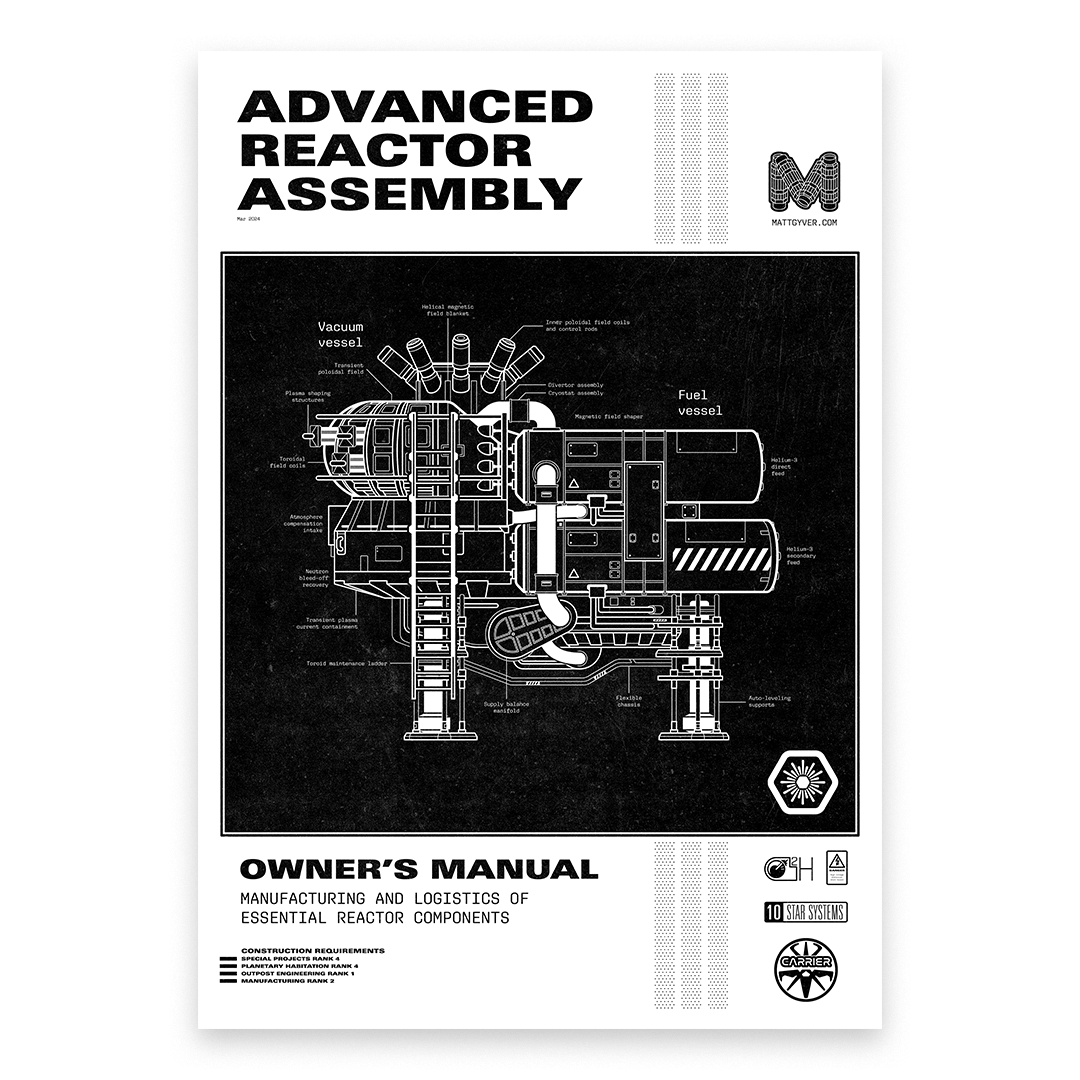
Ready to become reactor royalty or a magnet magnate? This meticulously crafted, 12-page, vintage black and white technical guide fully details the logistics and assembly of Starfield’s advanced nuclear reactor. Suitable for framing, each page of the digitally printed full size broadsheet newspaper is packed with instructions, details, schematics, and other notes needed to become the settled system’s leading provider of clean and reliable nuclear energy.
Features include:
Full-size 350mm × 500mm broadsheet newspaper (700mm × 500mm spreads).
The above dimensions mean it’s BIG; literally a 12-page newspaper.
General outpost construction notes (excerpts from my Starfield Outpost).
Schematics for vytinium fuel rods, (the gold-standard XP farm), control rods, power circuits, tasine superconductors, rothicite magnets, and many subcomponents.
Helium-3 distribution notes.
A large, centerspread map with every system labeled, detailing an optimal crafting and selling route.
Diagrams on locating multi-biome resources.
…and much more!
For more on the creation of this including closeups and a high-quality PDF to print yourself (only if you hate newspaper ink), check out my manufacturing flow diagram article.

Unlimited credits from crafting consumables
Here is the leanest, cleanest, meanest, outpost setup to craft every chem, food, and drink possible. This is probably the best and most legitimate response to all the nay-sayers when they ask "what is an outpost, a miserable little pile of glitches?" How about unlimited consumables to use and sell, that's what. This is a ridiculous min-max way to make the most amount of food and chems, with the least amount of weight, using the fewest amount of outposts, and sell everything for a huge amount of credits.
These recipes represent only the chems and food items that are completely craftable from extracted/farmed resources, and which do not rely on item drops or purchasable goods such as bread, battlestims, beans, butter, black hole hearts, bears, beets, Battlestar Galactica, etc.
Consider a single vytinium fuel rod: 11 mass worth 836 credits. For the same mass in analgesic poultice (a single one is .1 mass/450 credits), you’ll have 110 poultices with a total list price of 49,500 credits—a profit increase of over 5850%. That’s some serious product 💊🎉
Food and chem recipe diagram with the suggested sales route.
The entire network operates with 5 outposts. Three of which are essential, one is marginally important, and one is optional. The main outpost is on Serpentis IV and can function as a stand-alone amp farm, because that's what the kids want these days. It has an incredible amount of organic production capabilities which will be supplemented by the other outposts.
Food and chem manufacturing outpost setup.
Serpentis IV: The main outpost. Primarily an amp farm, but will produce a handful of chems. While you're in the Serpentis system, grab a nice Va'ruun ship and some high level gear before setting up your drug kingpin outpost.
Serpentis V-d: By sending alkanes to the Serpentis IV outpost, your amp farm can now make basic liquor, and is ready to send helium to intersystem cargo links for the rest of the ingredients. This setup can be a bit tricky to find He3 and alkanes together—instructions are in the diagram. There are also plenty of opportunities to find iron and aluminum at the same outpost.
Groombridge VIII-a: Now you can make almost every soda, alcohol, food item, tea (XP up!), and more. Boom Pop! Dynamite is what I prefer over amp because sodas are less addictive [...drinks 5th Boom Pop! before breakfast], the XP-up alien tea is great, and so is the lumberjack julep/very heavy water for a little extra carry weight and damage resist. You can now indiscriminately drink and fight and shoot your way through the cosmos. At this point you could stop and be content, unless you want those lovely O2 shots…
Freya III: Snake oil and O2 shots are now in your repertoire. This could really be optional too, as O2 shots are never a product I used a lot (the personal atmosphere power is far better). They sell for a pretty stack of creds though, and making them en-masse doesn’t interfere with raw materials needed to make analgesic poultices. Procyon A:Procyon III is a fine alternative for self-sustained sedative farming and additionally offers ornamental and antimicrobial and a host of other goodies.
Alpha Andraste III: OPTIONAL! By adding this 5th outpost you'll be able to make the final, fully craftable chem: repairing immobilizers. Which you'll likely never use, and can simply sell for a lot of credits.
Note: If your game is glitched and limits your cargo links to 3 instead of 6 (like mine every NG+ until I console command to fix it), or you simply don’t have the skills yet, I would set up Serpentis V-d for alkanes and two He3 intersystem links. Send helium-3 to Groombridge VIII-a to pick up only aromatic (essential for teas and sodas), and the other to Freya III to pick up sedative (can still make snake oil and O2 shots). Ship the alkanes, aromatic, and sedative back to your trap house on Serpentis IV. The diagrams are the same, you’ll just be managing less resources.
Grab the free high quality PDF of the food and chem infographic. It’s formatted to print on both sides of an A4 page (US legal-sized 8.5”×14”). Enjoy!
If you prefer more of a showpiece graphic, the entire setup and food/chem flowchart is available in the store as a 16”×20” poster on vibrant, museum-quality paper.
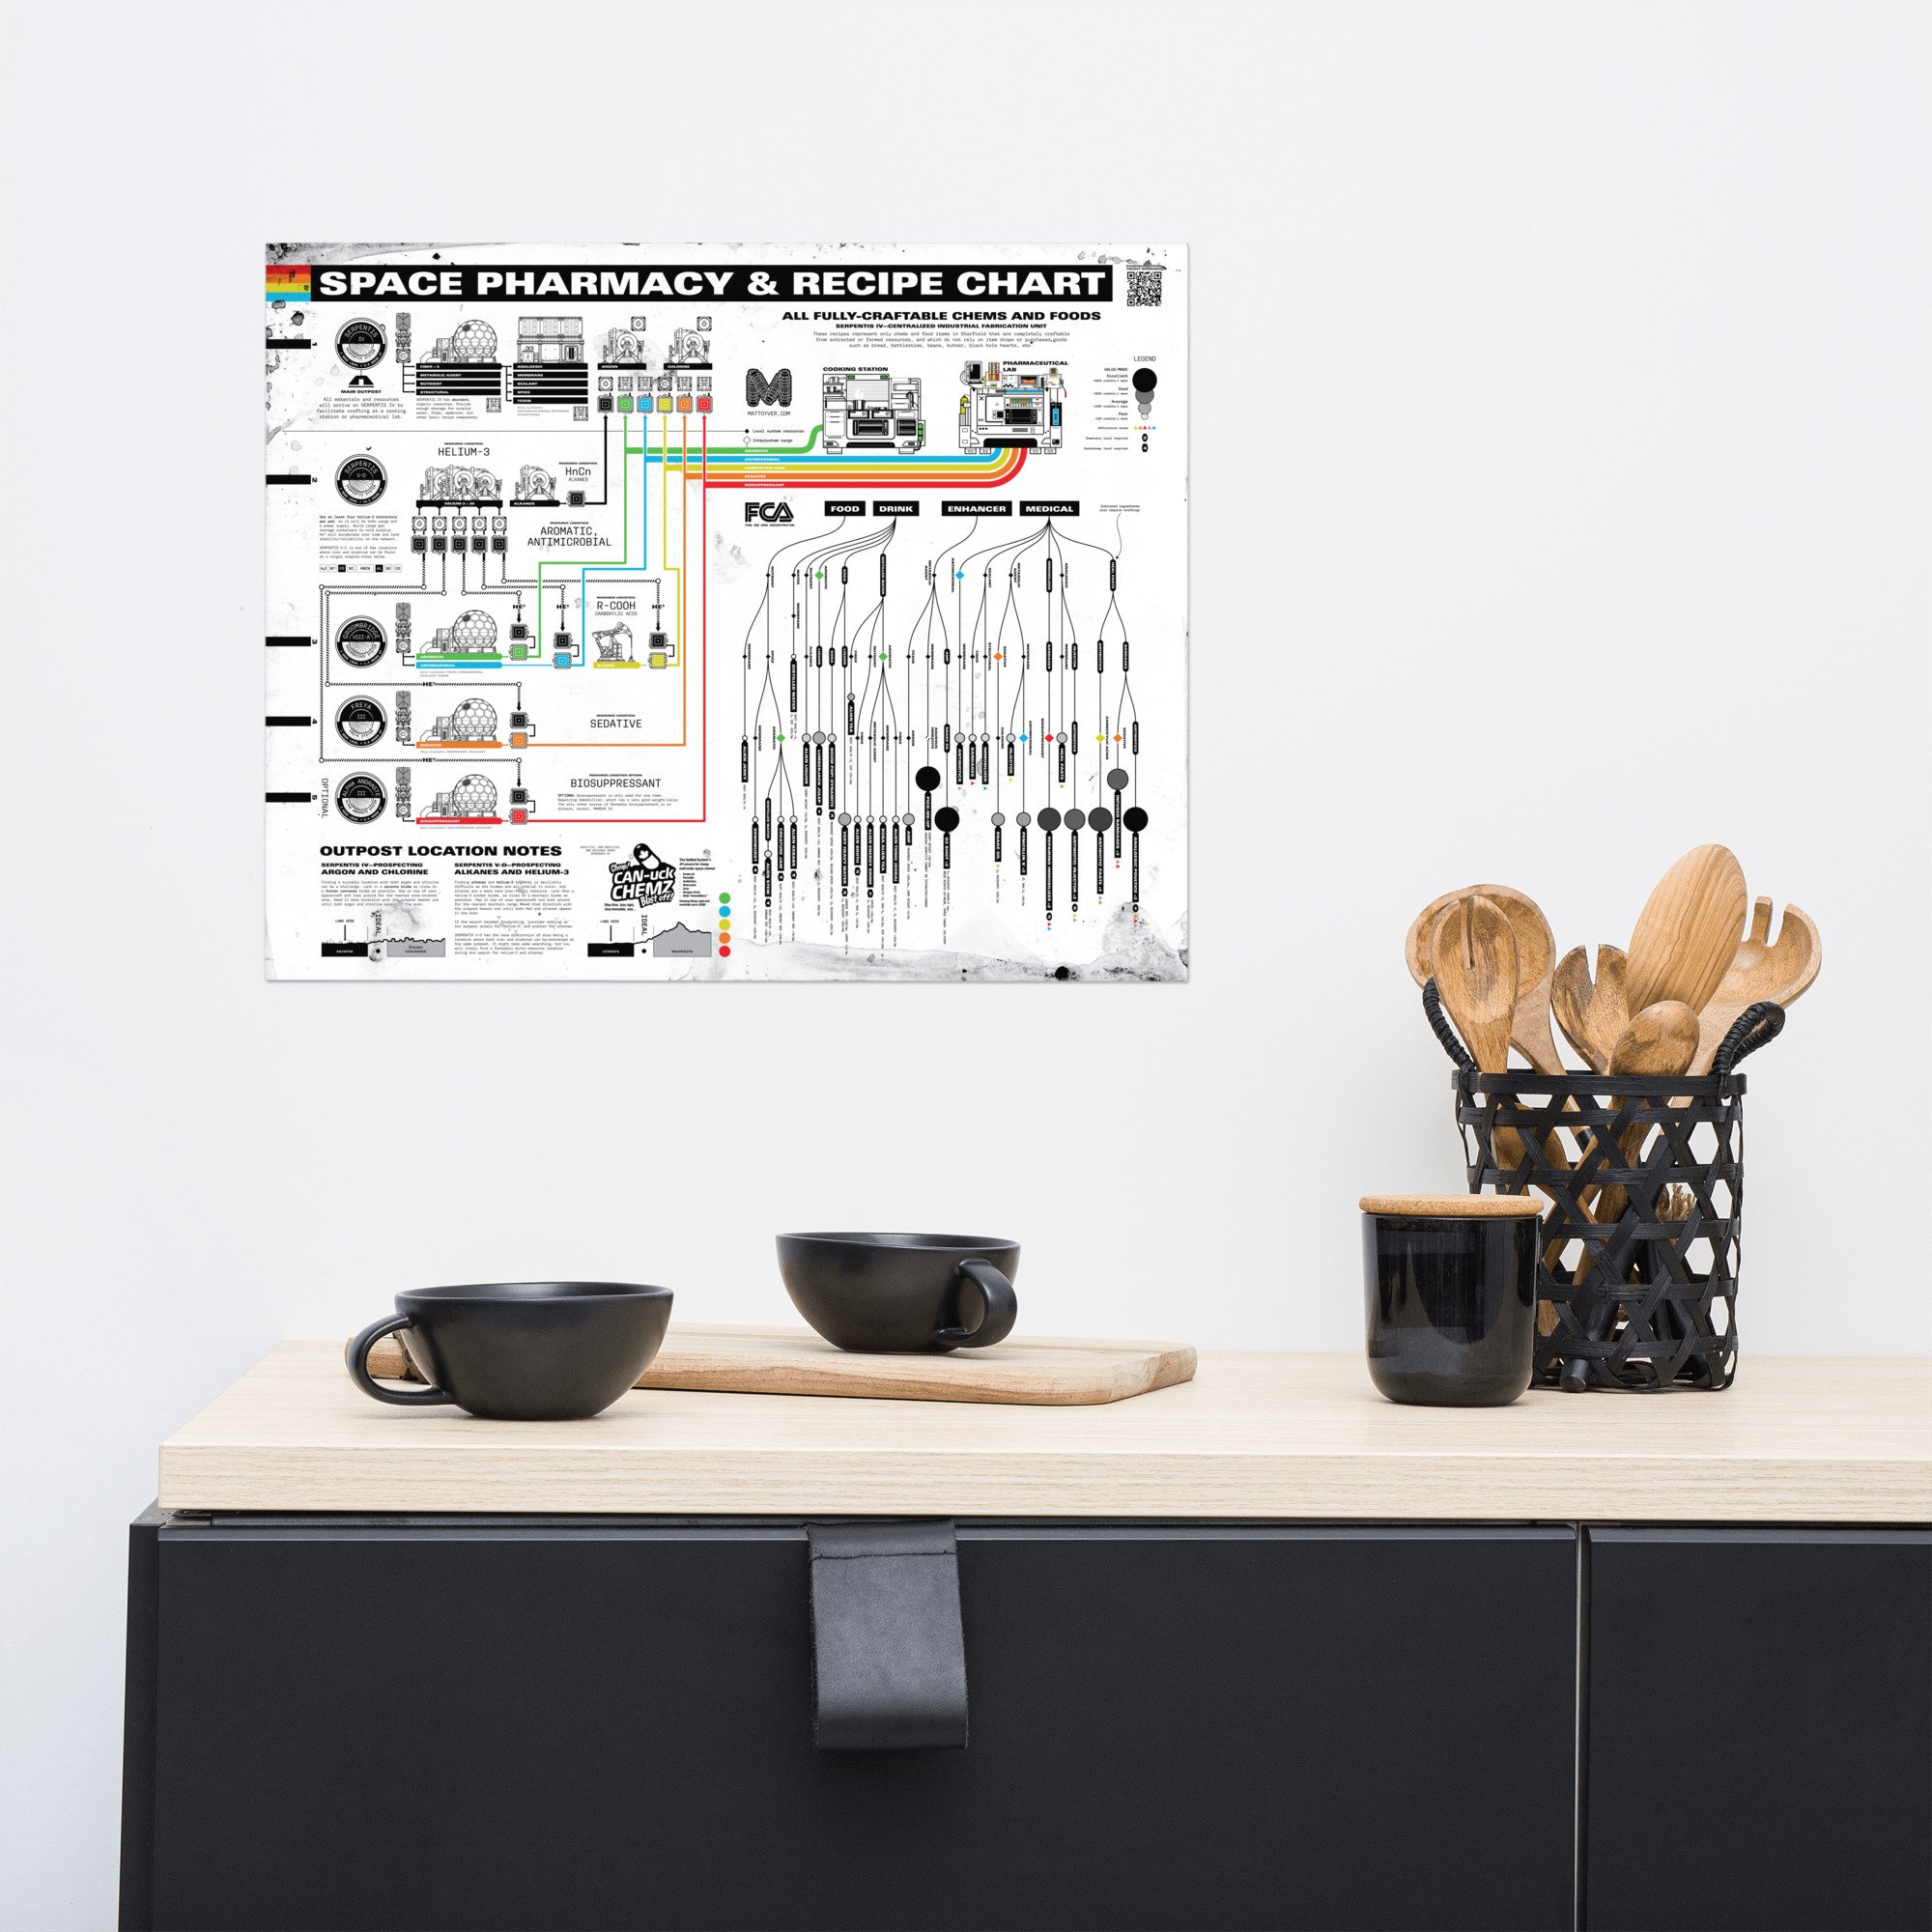
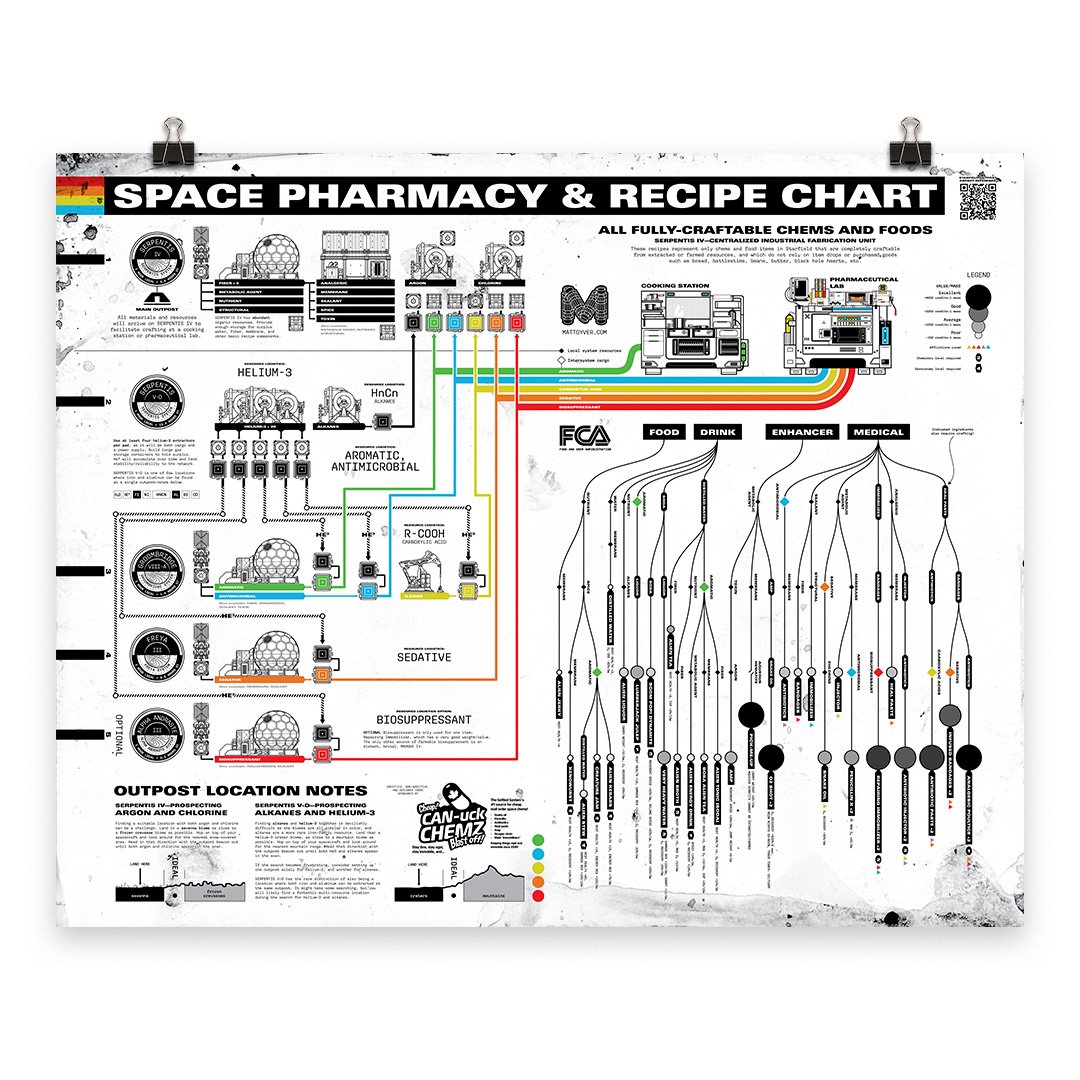
This 16”×20” diagram is the leanest and cleanest outpost setup to craft every chem, food, and drink possible in Starfield, printed in vibrant color on thick, luxurious, museum-quality paper, with a delightfully worn background texture (yes, it looks just like the pictures :D). These recipes represent every item that is completely craftable from scratch using extracted/farmed resources from the indicated outposts, without relying on item drops or purchasable goods.
In a nutshell, this is a ridiculous min-max way to make the most amount of food and chems, with the least amount of weight, using the fewest amount of outposts, and sell everything for a huge amount of credits... and maybe save some product for yourself. Let's cook!
• Dimensions: 20×16 inches (50.8×40.64 cm)
• Paper thickness: 10.3 mil
• Paper weight: 189 g/m²
• Opacity: 94%
• ISO brightness: 104%
• Paper is sourced from Japan
Check my Starfield Outpost page for more information, notes, and a smaller printer-friendly PDF of these diagrams.
Wrapping up
There used to be a section here about building really tall habs, but I believe these glitchy bits have been patched out and not possible anymore—or at least not worth the trouble (just use a mod instead). The habs-on-landing-pads still works pretty well, and I may showcase that in the future. But in the meantime, enjoy something more… lively: me negotiating an early retirement from the Crimson Fleet.
This was a fun mini build using the vanilla furniture/decorations and the round hydroponic hab (my favorite). I approach starfield decorating like an interior design project and divide the space into several ‘rooms.’ Creative use of the large potted plants as walls, some short wooden coffee tables as the throne dais, and several glass display cases to feature all the contraband while still being able to see into the other spaces helps set the mood. Using the floor markings as guides, everything is then neatly arranged into a symmetrical series of rooms. After the initial setup it’s simply a matter of collecting heads and other knick-knacks to make it more homey 😉. FYI: I averaged about 2 heads per Crimson Fleet POI.
Coffee tables make a neat little dais, though a bit finicky.
Fancy chairs like this beauty are in the Decorations 3 research tier.
Giant potted plants recently added to Starfield make perfect room dividers.

Initial rough build. Replaced planters with the huge variety, and slowly added decorations—and heads—as I collected them.
Choose a location with a dramatic view and sunrise or sunset that matches your aesthetic. Additionally, be sure to unlock all the outpost decorations from the research terminal for the most luxurious pieces. Most of the fancy chairs, rugs, pedestals, and so on are unlocked in the Decorations 3 tier. Here’s a flythrough with everything furnished. Enjoy!
Credits
Thanks for reading! My notes and organizational efforts were helped along by these fantastic data gatherers:
24 Outposts, Every Farmable Resource Details every unique resource and the outposts needed to farm it all by Redditor mistacosplay.
Starfield - Resource overview of systems - Google Sheets This sheet details all the planets and their resources by Redditor Admirable-Name-5495.
Starfield - Outpost building worksheet - Google Sheets This worksheet calculates materials and component needs for outpost construction from Redditor kestrel_one.
Starfield - Automating Organic Resources - Google Sheets This brief spreadsheet details which planets offer farming of which resources by Redditor Ketobby.
Starfield - Aid Effects + Recipe List - Google Sheets This extensive spreadsheet details recipes, ingredients, and crafting various things at outposts from Redditor Jimmayus.
Vytinium fuel rod chart: crappy : Starfield (reddit.com) A special thanks to Redditor rolux and other information about vytinium fuel rod crafting logistics from that post.
This rather nice online search tool for system and planet resources.
For furniture and other outpost decorations, here’s a video showcasing everything. And another with the new goodies released in the ship decorations update.
