
Starfield Manufacturing Flow Diagrams
Overview: A technical walkthrough and downloadable print of Starfield’s advanced reactor manufacturing chain, illustrating how to automate outposts, optimize cargo links, and craft high‑value reactor components with detailed flow diagrams.
As a fan of technical illustrations and data visualizations, I wanted to diagram the manufacturing process flows for an advanced nuclear reactor in Bethesda’s Starfield. The complexity and logistics involved with producing even the simplest component can be puzzling, and doubly so considering the minimal handholding and vastness of Starfield’s planets and resources.
The ultimate goal of this is to empower players to craft high value/high XP components en masse, with minimal effort, by automating resource collection and minimizing travel time.
This whole endeavor is probably the fever dream of a madman. Sounds fun, no? My only tools will be Starfield system data, an adventurous spirit, and Adobe Illustrator. Let’s begin!
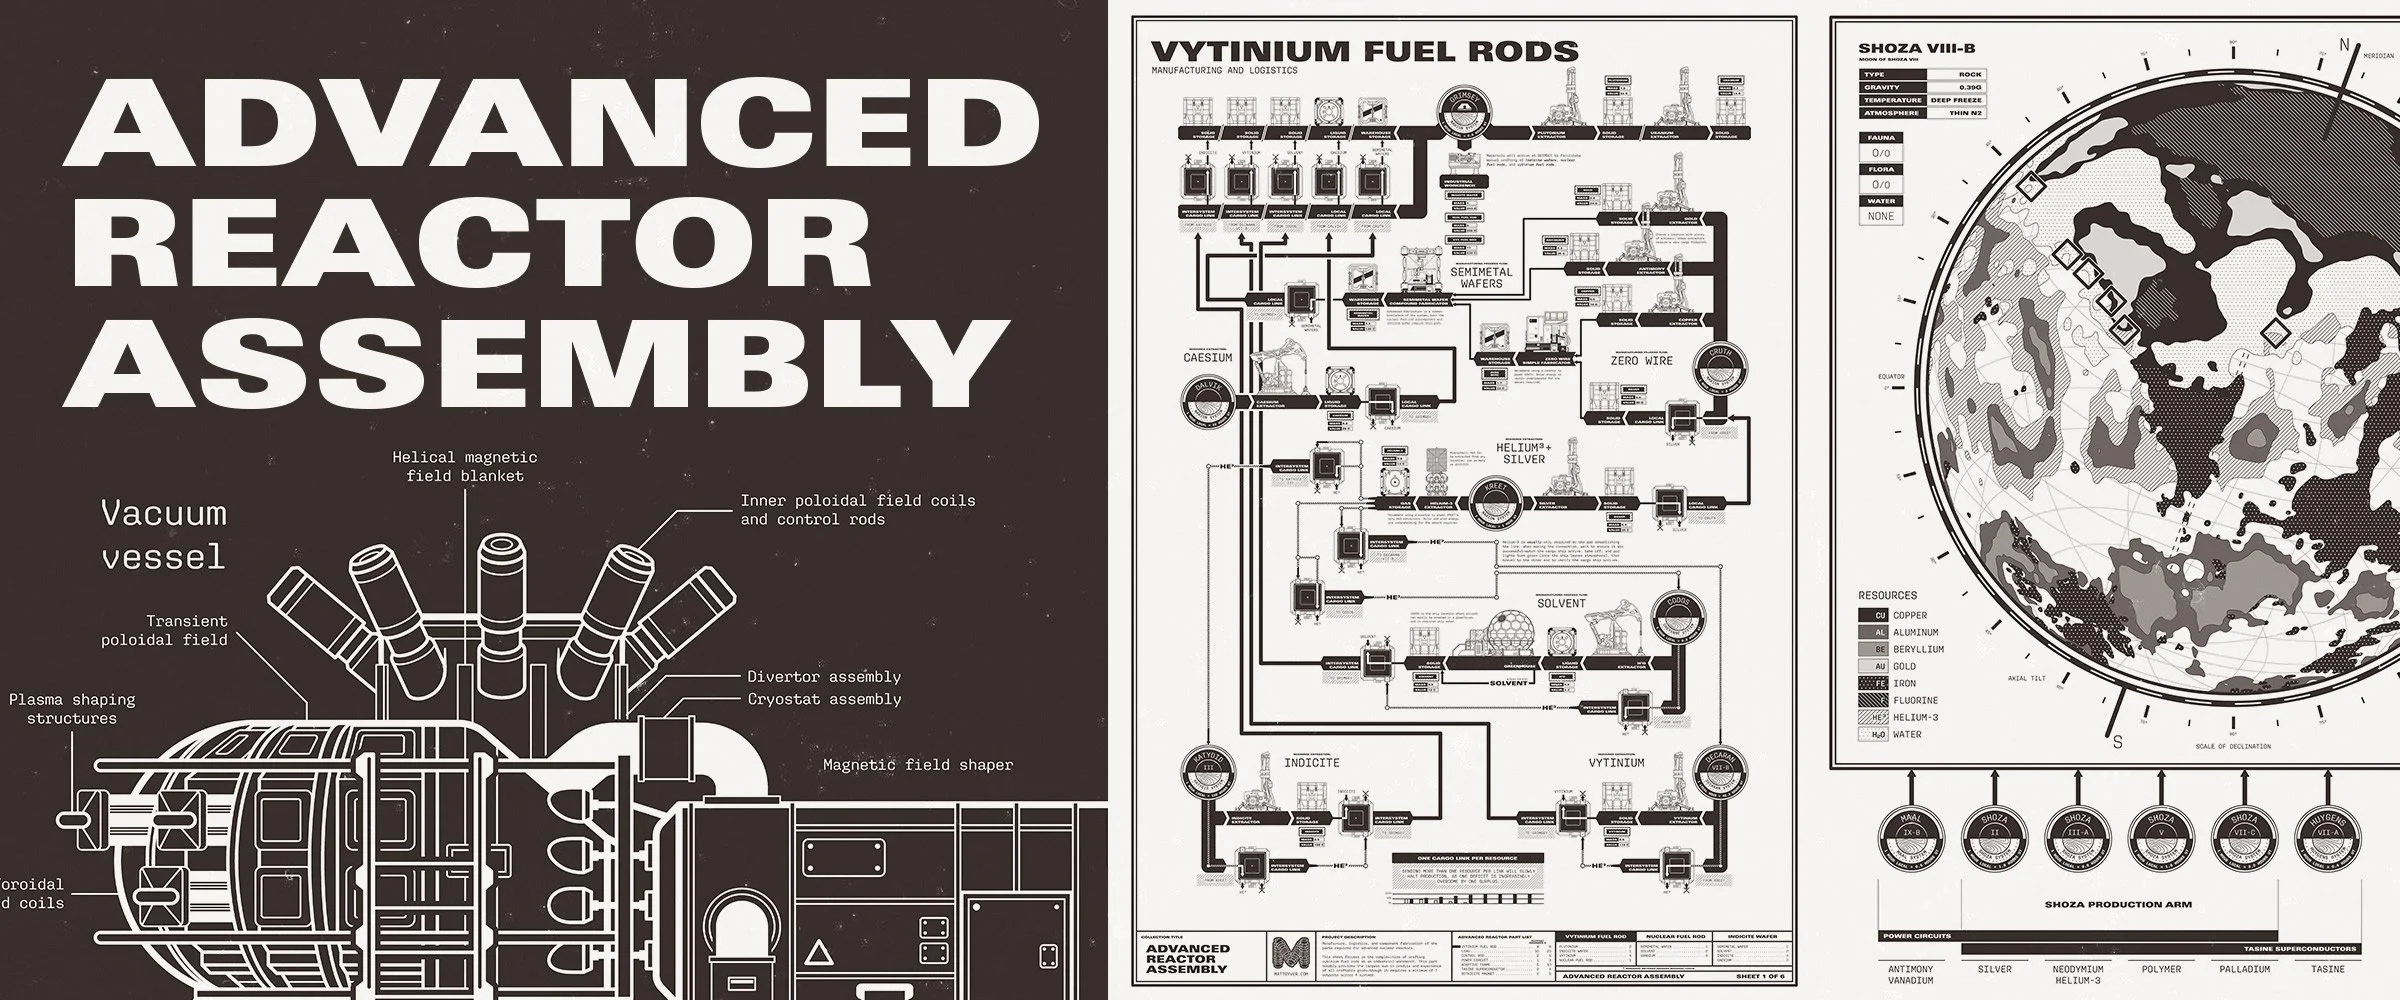
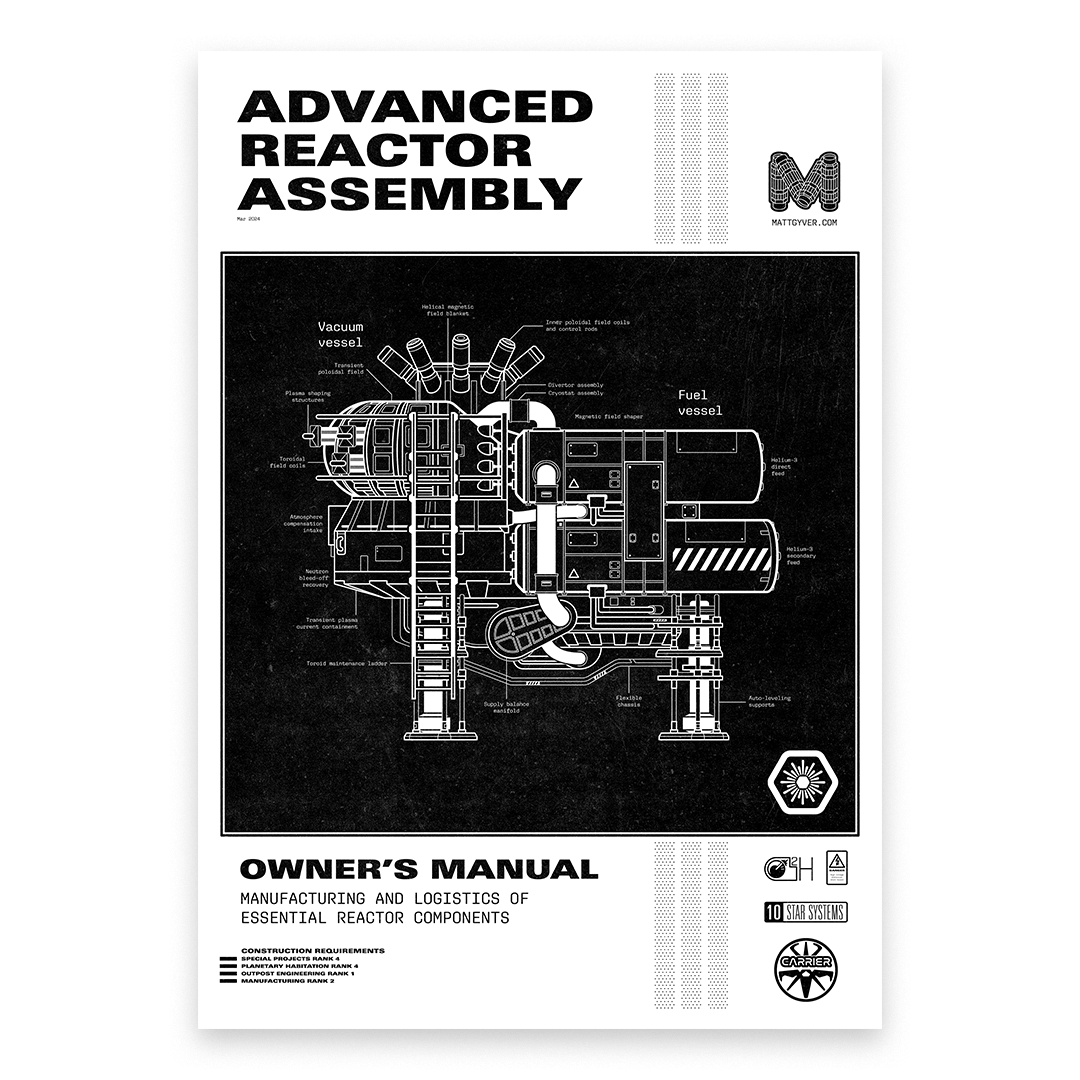
The cover art is a wireframe illustration of the reactor itself, complete with techno-jargon from real life tokamak reactors.
Advanced Reactor Assembly
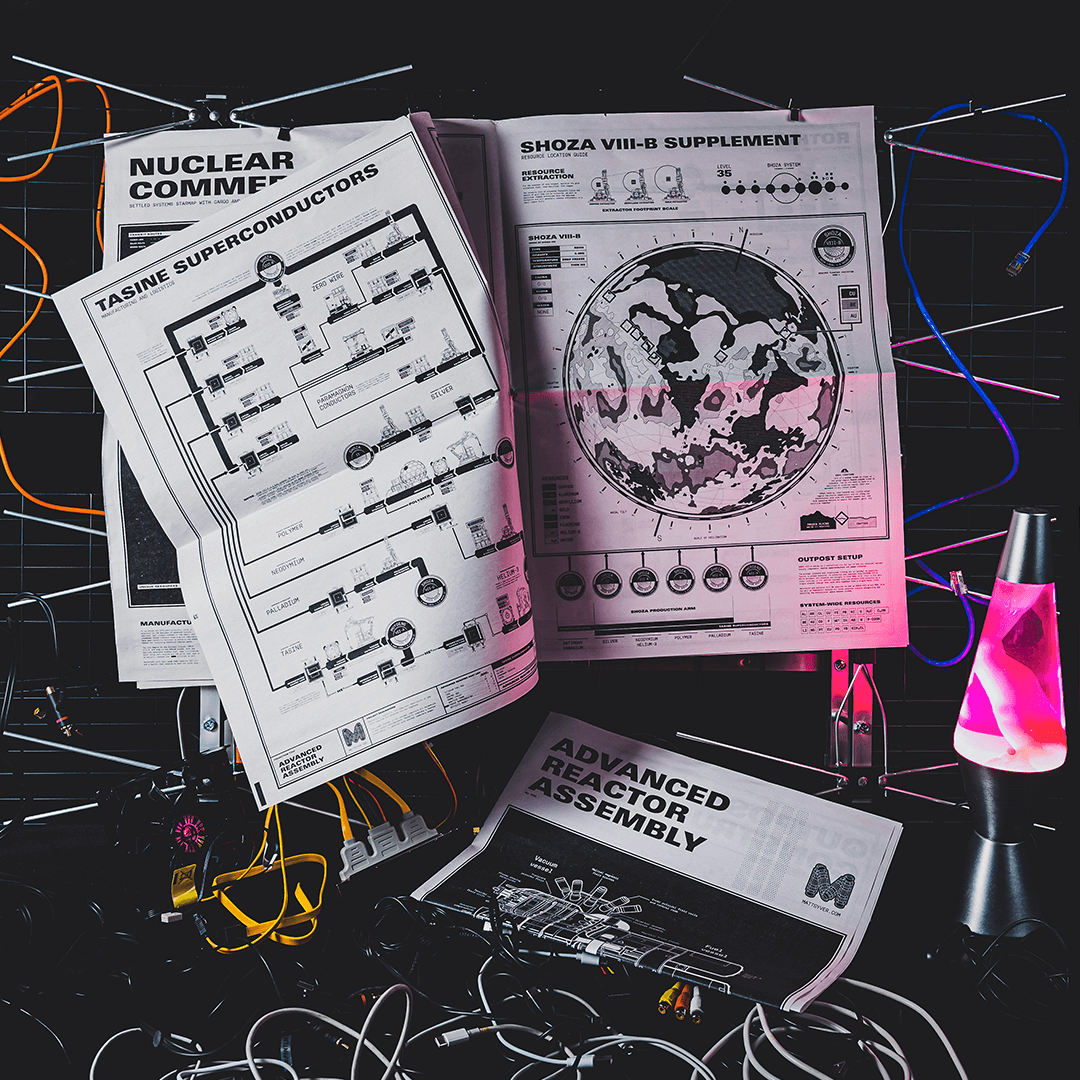
The cover page is a throwback to that old vintage vehicle manual style. Since this is a retro-inspired technical guide, it seemed only fitting. The finished piece is printed as a large 12-page broadsheet newspaper and serves as a handy guide for players and a beautiful infographic piece suitable for framing.
Outpost automation and crafting requirements
The requirements to build advanced nuclear reactors are steep—several expensive, heavy, and obscure parts will need to be crafted and/or automated across many outposts and systems—and every subcomponent has additional subcomponents, all the way down to raw materials. There’s a limit on outposts (24), and within each outpost is a limit on cargo transports (6).


The first page covers the basics: outpost composition, crafting recipes, materials to have on hand, and more. The opposite page shows a schematic for crafting the most sought-after reactor part: the vytinium fuel rod.
For more outpost information and a deep dive into understanding the vytinium fuel rod schematic head over to my Starfield Outpost Pocket Reference page.
Basic outpost composition and notes, including outpost locations, staryards, and crafting recipes.
The holy grail of crafting in Starfield; vytinium fuel rods are highly valuable and provide lots of experience.
In the diagrams, each outpost is defined by an informational badge with branching arms to indicate connections to structures and resources. Arrows are used to indicate resource flows and connections.
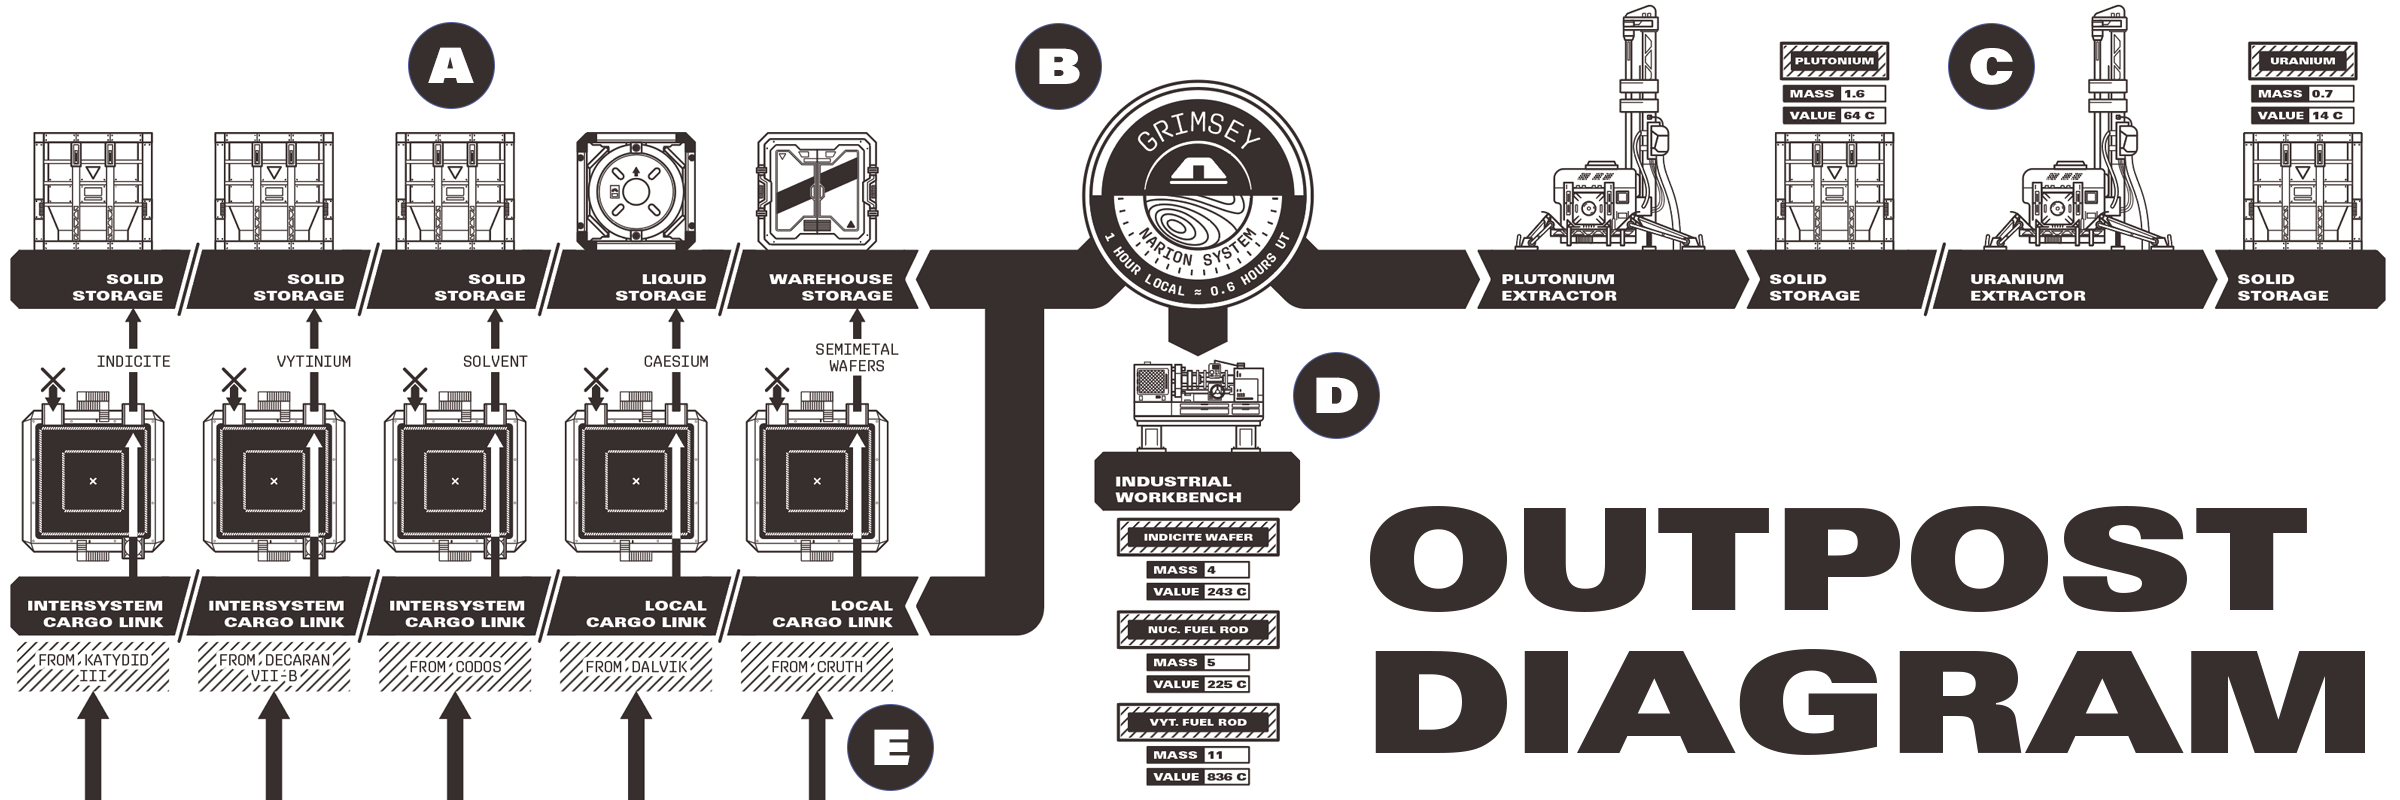
A. Onsite storage containers. B. Outpost: name, system, and time dilation. C. Onsite resource extraction flows. D. Components to be crafted at a workbench. E. Imported cargo.
The biggest logistical challenge is minimizing the outposts needed. Since there’s a limit of 24, it’s important to choose systems that contain the majority of needed materials. Any missing resources must be shipped across interstellar space. These intersystem locations require helium-3 to power the transports, which eats up valuable outpost space and additional cargo links.
Starfield cargo link optimizations
One more note on cargo links; every link should only transport a single item. Materials are extracted/fabricated at different rates, and any imbalances will cause deficits in certain goods to be overrun by the surplus of other goods.
Having multiple things per shipment will eventually clog automated systems by choking out the slower items. Normally this isn’t a big deal, but each outpost can only support 6 cargo links, so plan ahead.
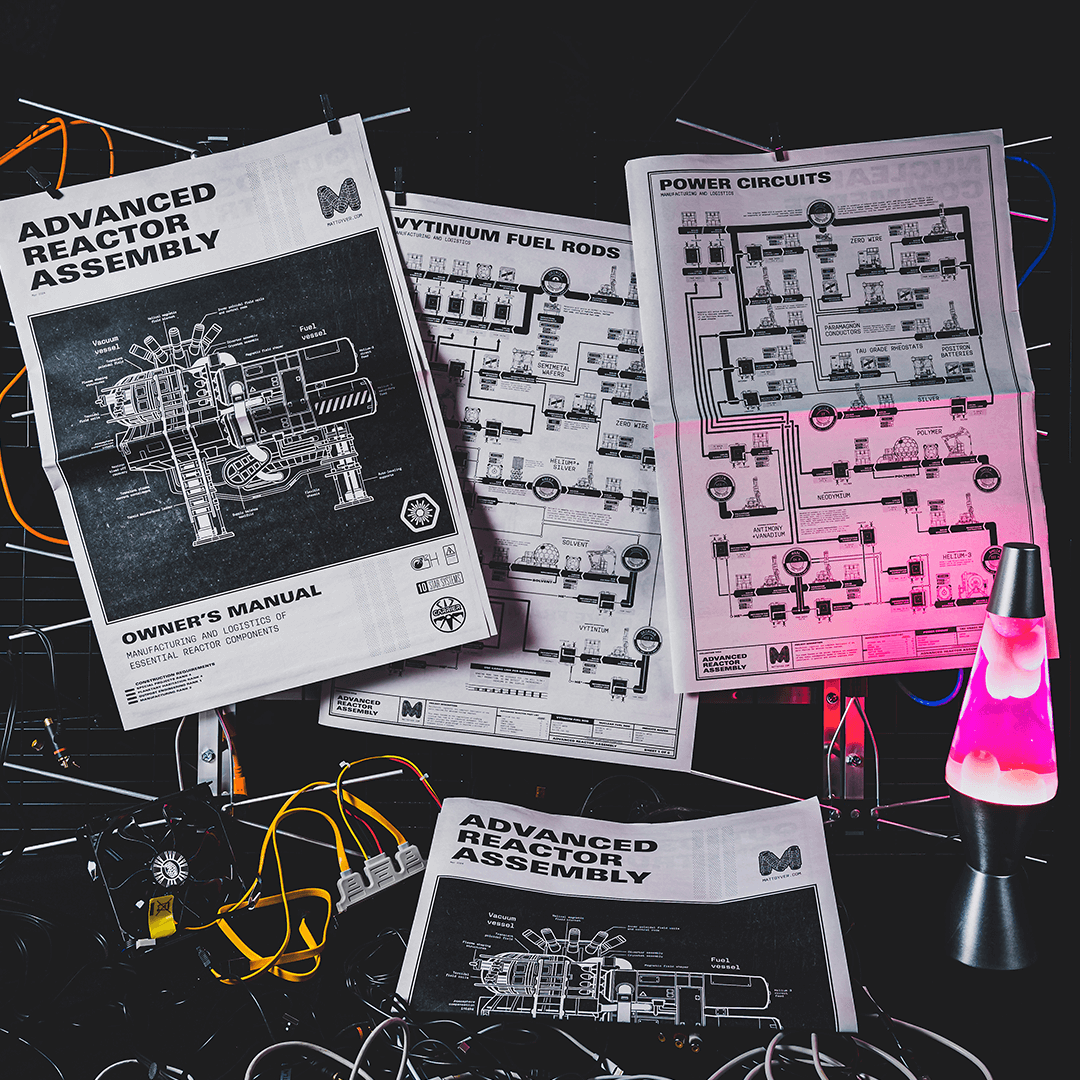

The next pages cover three more manufacturing flows. Two simple, and one ridiculous. Notable here is the adaptive frame flow, which needed a little map to illustrate locations where both raw materials can be found at a single outpost.
Simpler production flows. Adaptive frames are tricky, they require a map to find both resources in one place.
The seeming complexity here is largely due to automation; one only needs to manually craft power circuits.
Out of the 100+ star systems, Kumasi is only one of two that contains every necessary resource for control rods. The alternative system, Alpha Tirna, doesn’t improve the setup in any meaningful way. It’s important to avoid single-resource outposts as much as possible, though it was unavoidable here.
On the power circuit diagram, Maal IX-B is the only moon where vanadium and antimony can be found together. The schematic displays each resource being shipped separately, which is ideal, though later diagrams require combining these in order to stay within the cargo link allowance.
The lower portion of each diagram contains basic info about the parts needed, resources required for the part on that sheet, and other supporting materials.

A. Collection title. B. Current sheet description. C. Parts list for reactor, current sheet indicated. D. Materials to manually craft the parts on current sheet E. Materials required for automated or fabricated parts.
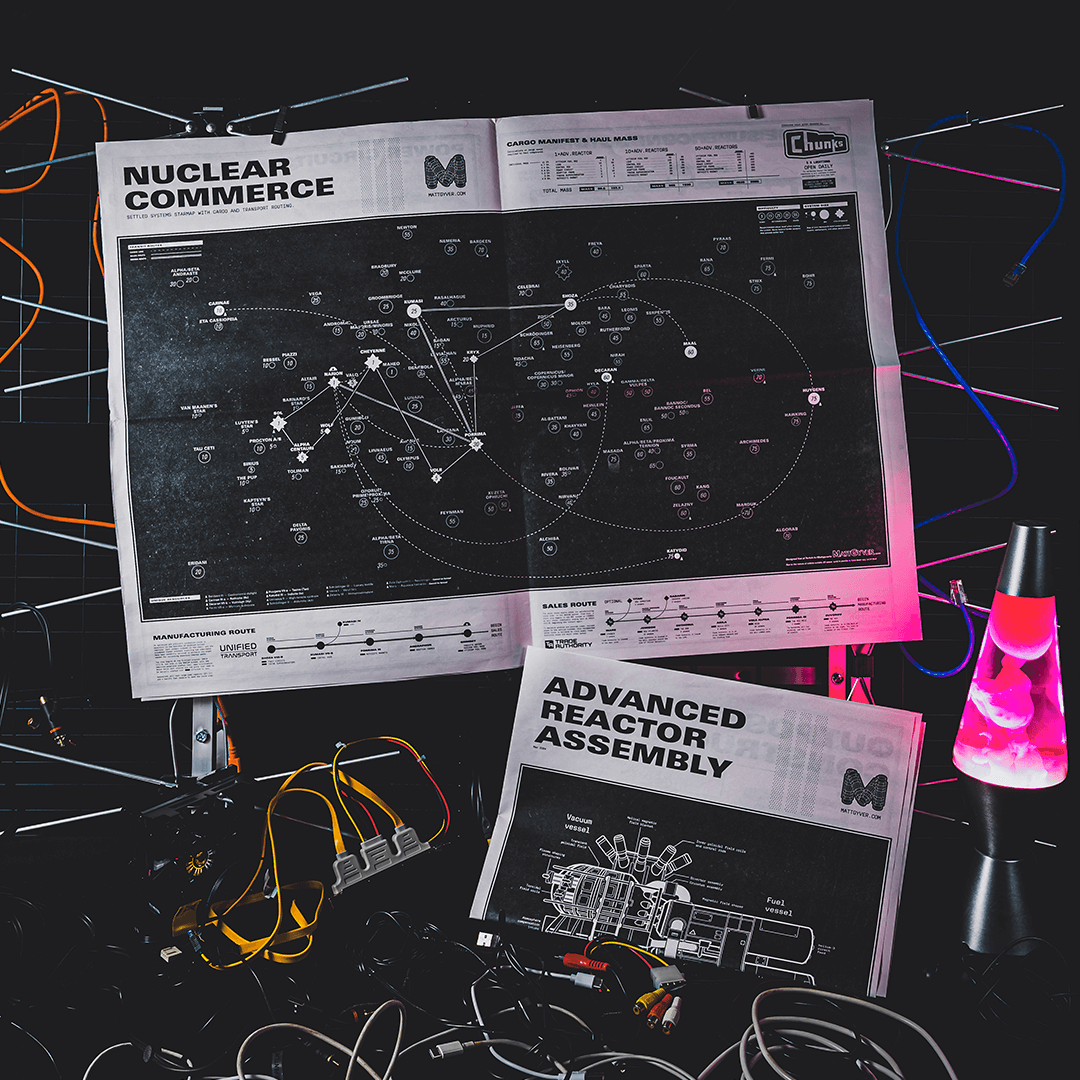
To keep track of all the outpost locations and resource shipments, the newspaper’s centerspread features a bold commerce map of the settled systems (a more focused version of my larger Starfield System Map).
The Starfield map showing all systems involved in manufacturing reactor components, and the routing to sell those components.

Download this 8000px+ high resolution map to use however you’d like (it’s the same distressed version used for the store newsprint).
Data on this centerspread includes cargo mass requirements and individual part weights. It’s easy to become overloaded so a little planning goes a long way.
The bottom margins show a recommended circuit for manufacturing and selling components. The sales route is useful for every player, not just magnet magnates and reactor royalty.

Tasine superconductor? I barely know her! Now let’s build some tasine superconductors. For the next manufacturing flow we return to Shoza VIII-B. Tasine superconductors have a nearly identical manufacturing chain as power circuits—simply swap out the antimony and vanadium with tasine. So rather than set up an all-new production chain in a different system, it’s far more convenient to simply scale up the existing operation to meet both needs.
However, Shoza VIII-B has strict requirements for outpost placement, so a map was needed to help identify candidate locations where the three necessary resources can be found together.
Shoza is the ideal system for tasine superconductors as it contains all but one resource.
A map was needed to locate several resources from disparate biomes at a single outpost.

The final newspaper spread is for rothicite magnets. This resource chain will utilize many of the outposts that are already set up. The only new outposts needed are two in the Porrima system: the primary hub of Porrima III, known famously for the Red Mile, and Porrima III-B, which is used as the third and final helium-3 supplier.
Rothicite magnets uses a lot of previously established outposts.
Opposite spread for rothicite magnets includes some helium-3 notes on distribution.
Helium-3 is needed to power all intersystem cargo links, so a portion of this page spread is dedicated to those three outposts and where each one is sending cargo. To start with a strong supply of He3, set up extraction first while the rest of the production chain is established.
A. Helium-3 extractor. B. Active helium-3 cargo links. C. Cargo links sending something other than helium-3. D. Helium-3 vapor extractor. E. Callout to set up helium-3 first.
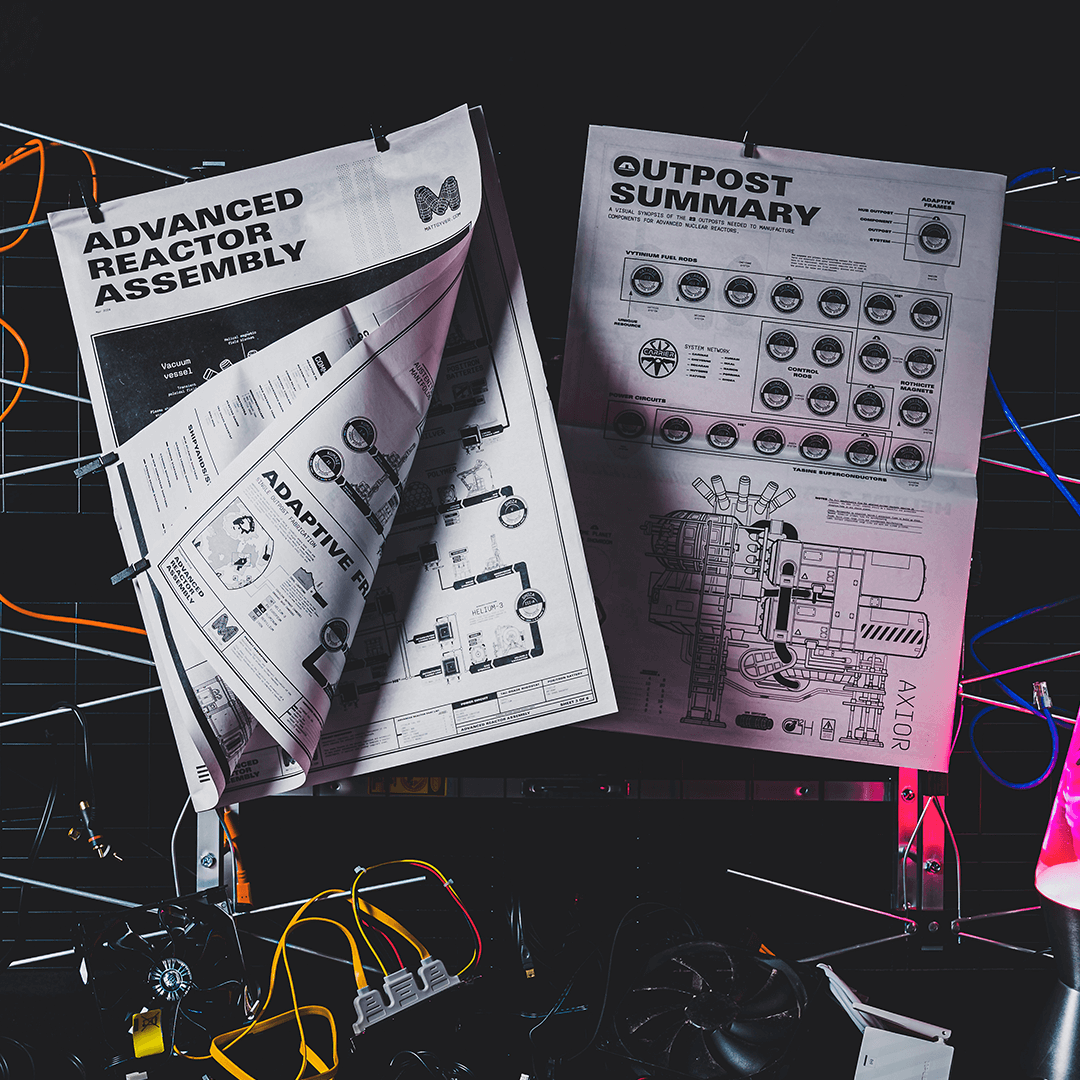
Lastly, the back page is an overview of every outpost, system, primary hub indicator (places the player stops to craft components), notes, and more.
An outpost summary showing how each ties into the components produced.
Wrapping Up
Looking back, I was pleasantly surprised this could all be accomplished in under 24 outposts. The entire effort took well over 200 hours to gather data, illustrate the various pieces, work out the logistics, and of course… play test. I absolutely love this technical kind of thing.
Download the guide or grab a print
Download a free high quality PDF of the advanced nuclear reactor assembly guide to print (or have printed 😉). Enjoy!
But if you would rather have the huge, digitally printed, vintage 12-page broadsheet newspaper seen in the above photos, suitable for framing—grab one from the store. Nothing beats the smell of ink!
Ready to become reactor royalty or a magnet magnate? This meticulously crafted, 12-page, vintage black and white technical guide fully details the logistics and assembly of Starfield’s advanced nuclear reactor. Suitable for framing, each page of the digitally printed full size broadsheet newspaper is packed with instructions, details, schematics, and other notes needed to become the settled system’s leading provider of clean and reliable nuclear energy.
Features include:
Full-size 350mm × 500mm broadsheet newspaper (700mm × 500mm spreads).
The above dimensions mean it’s BIG; literally a 12-page newspaper.
General outpost construction notes (excerpts from my Starfield Outpost).
Schematics for vytinium fuel rods, (the gold-standard XP farm), control rods, power circuits, tasine superconductors, rothicite magnets, and many subcomponents.
Helium-3 distribution notes.
A large, centerspread map with every system labeled, detailing an optimal crafting and selling route.
Diagrams on locating multi-biome resources.
…and much more!
For more on the creation of this including closeups and a high-quality PDF to print yourself (only if you hate newspaper ink), check out my manufacturing flow diagram article.